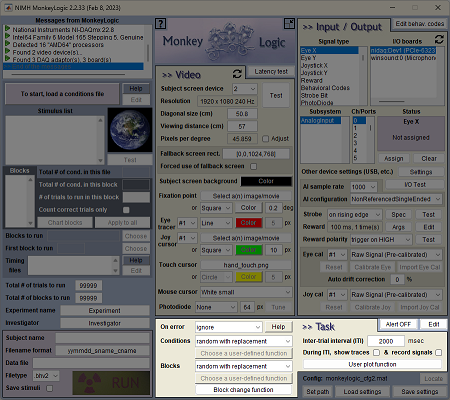
Main Menu
- Logo & Load/Save Settings
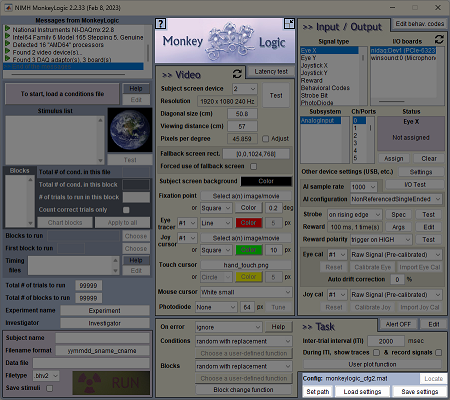
- Three monkeys logo: Opens the NIMH ML online homepage.
- Question mark on the top-left corner of the logo: Opens the NIMH ML offline manual.
- Collapse/Expand menu button (on the top-right corner of the logo): Hides/shows submenus (Video, Input/Output and Task). The collapsed menu is useful when running NIMH ML on a small screen.

- [Locate] config button: Opens the config file folder. It is usually the current task directory.
- Set path: Creates a list of folder paths that NIMH ML will search for stimulus files. The search order is:
- Given path to the file, if the filename is a full-path string
- Current task directory, where the conditions file or userloop file exists
- NIMH ML installation path
- From the top of the search path list

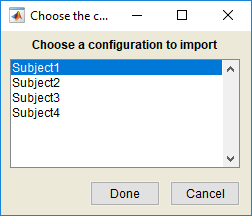
- Load settings: Once a config file is chosen, a window will pop-up with a list of subject names to select settings to load. Note that "# of trials to run in this block", "Count correct trials only", "Blocks to run", "First block to run" and "Subject name" are not overwritten, if the settings are loaded in this way.
- Save settings: Stores the current settings to the config file (*_cfg2.mat). The button is activated only when an option has changed. If any change is about to be overwritten without being saved, a file save dialog will pop up. The current config is saved without asking, when the 'RUN' button is clicked.
- Conditions File & Run Button
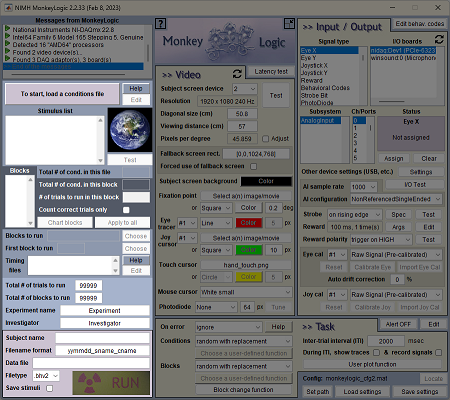
- [Load conditions file] button ("To start, load ..."): Opens a conditions/userloop file (i.e., load an experiment).
- [Help] button: Opens the conditions file manual.
- [Edit] button: Opens the current conditions file in the text editor. The conditions file should be reloaded after edits have been completed.
- [Stimulus list] pane: Shows the list of the stimuli found in the conditions file. If the opened file is a userloop function, it will display 'user-defined'.
- Earth icon: Displays the stimulus selected in the [stimulus list] pane.
- [Test] button: Displays/plays the selected stimulus, as if it is displayed/played during a trial. Pressing any key will stop the test.
- Total # of cond. in this file: Displays the total number of conditions found in the selected conditions file.
- [Blocks] pane: Displays the available blocks.
- Total # of cond. in this block: Displays the total number of conditions associated with the selected block.
- # of trials to run in this block: Edit this value to determine the number of trials to be run in the selected block.
- Count correct trials only: As it states.
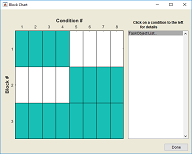
- [Chart blocks] button: Opens a figure that shows which conditions appear in which blocks, such as the following one.
- [Apply to all] button: Applies the changes to all blocks.
- Blocks to run: Only the blocks selected here will be used during task execution. Initially all blocks are selected.
- First block to run: Select the first block to run, when the task starts. 'TBD (to be determined)' will let ML determine it, according to the block selection logic in the Task submenu.
- Timing files: Lists the timing scripts used by the current conditions file. In case that a userloop function is selected, 'user-defined' will be displayed instead. Double-clicking the timing script name will open its runtime file (or the runtime folder if the runtime file is not created yet). The runtime file is a custom MATLAB function that is created by combining the user timing script and a runtime function provider (trialholder_v1.m or trialholder_v2.m) when the RUN button is hit. What ML runs to start the task is this runtime file, not the timing script itself.
- [Help] button: Opens the timing script manual.
- [Edit] button: Opens the selected timing file in the MATLAB editor.
- Total # of trials to run: Determines when the task will stop if not manually terminated. This number includes both correct and incorrect trials.
- Total # of blocks to run: Determines the total number of blocks (not block numbers) to be run; the task will end when this number of blocks has executed (or the "Total # of trials to run" value has been reached, whichever comes first).
- Subject name: NIMH ML keeps a separate configuration per each subject. If the entered subject name is new, then the current settings will be copied under the new subject name. If the entered name already exists in the configuration file, the settings previously saved under the name will be loaded automatically.
- Unlike the original ML, NIMH ML keeps the last changes of editable variables in the configuration file (per each subject) and does not read the variable values from the timing script ever again. When a new subject's profile is created, the values of editable variables are also copied from the last saved subject’s configuration. Therefore, in NIMH ML, editable variables are never reset to the initial values written in the timing script (unless reset by the user in the "Edit timing file variables" dialog in the Pause menu). So, to modify their values, do not edit timing scripts. Use the "Edit timing file variables" menu.
- When the task is loaded next time, the last subject's configuration will be loaded automatically.
- Filename format: Set the format of the default data file name.
- 'expname' or 'ename': Experiment Name
- 'yourname' or 'yname': Investigator
- 'condname' or 'cname': Conditions file name
- 'subjname' or 'sname': Subject name
- yyyy: Year in full (1990, 2002)
- yy: Year in two digits (90, 02)
- mmm: Month using first three letters (Mar, Dec)
- mm: Month in two digits (03, 12)
- ddd: Day using first three letters (Mon, Tue)
- dd: Day in two digits (05, 20)
- HH: Hour in two digits (05, 24)
- MM: Minute in two digits (12, 02)
- SS: Second in two digits (07, 59)
- Data file: Leave this field blank, to have it filled with the default formatted name.
- FileType: See "File Formats Supported by NIMH MonkeyLogic."
- Save stimuli: If checked, stimulus files used to create TaskObjects or adapters are kept in the data file. They can be extracted with the mlexportstim function later.
- [RUN] button: Activated when a task is loaded. Upon its being clicked, the current configuration is automatically saved and the task begins.
- Video
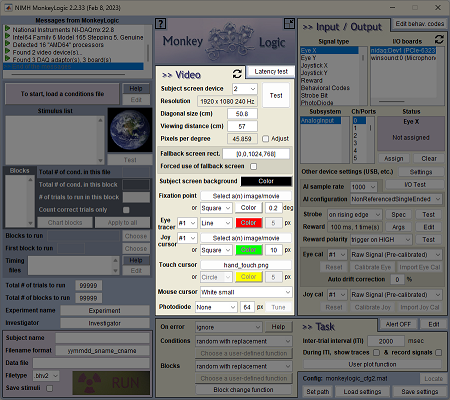
- [Latency test] button: Runs a benchmarking trial.
- Refresh screen devices (
 ): Click and refresh screen devices after connecting new monitors.
- Subject screen device: Lists the screens on the system.
- [Test] button: Displays an animation on the selected screen.
- Resolution: Pixel width & height of the selected screen. Use [Windows Display Settings] to change the resolution.
- Diagonal size (cm): Enter the diagonal screen size (in cm) of the subject's screen.
- Viewing distance (cm): Enter the distance (in cm) from the subject's eyes to the screen.
- Pixels per degree: This number is used by NIMH ML to compute the degrees of visual angle. It allows users to specify stimulus coordinates in degrees instead of pixels.
- Adjust: If the angular size of the subject screen is larger than 20°, a discrepancy occurs between the stimulus size estimated with the Pixels per degree (PPD) and the actual size measured on the screen. It is because the PPD is the average number of pixels in one degree across the entire screen but the tangent function is not linear beyond the 20° range. If this option is checked, NIMH ML fixes the PPD to the number of pixels in the central one degree, instead of taking an average. By doing so, the error of size estimation is reduced around the center area but it may become even larger outside the range.
- Fallback screen rect.: This fallback screen is a windowed subject screen and is used for testing when there is only one monitor. Set the screen location [LEFT TOP RIGHT BOTTOM] in Windows’ pixel coordinates.
- Forced use of fallback screen: Forces the subject screen to be displayed in a window.
- Subject screen background: Background color of the subject screen.
- Fixation point, Eye tracer, Joystick cursor, Touch cursor, Mouse cursor: Allows the selection of either an image/movie or a circle/square of given color and size for these objects. Mouse cursor is for Timing Script version 2 only, since v1 does not support mouse as a tracker.
- Photodiode trigger: Displays alternating black and white squares at the selected location to drive the photodiode.
- [Tune] button: To enable this button, "Photodiode" needs to be assigned on the I/O menu and the location of the photodiode trigger (white square) should be selected. See "Photodiode Tuner" for more information.
- Input / Output
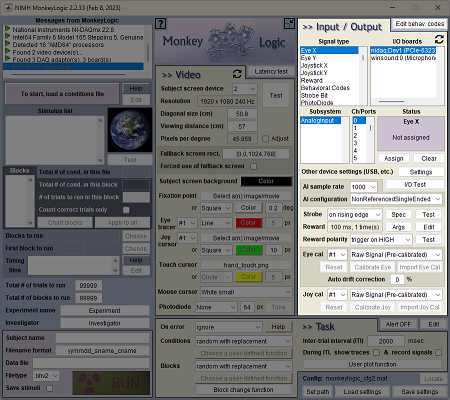
- [Edit behave. codes] button: Opens the "codes.txt" file that lists Behavioral Code numbers of the current task with their associated descriptions. If codes.txt exists both in the ML directory and the current task directory, the one in the task directory is opened and used for the task. This code-description association can be defined in the timing script with the bhv_code command as well.
- Reload I/O boards (): Click and refresh the NI board list after plugging in USB devices.
- DAQ board settings
- Click the panels in the order shown below (left figure), to associate behavioral signals to DAQ channels/ports. If you do not have this connection information, ask someone who knows it or visually check the wire connection with the device pinout diagram (see Device Pinouts).
- To assign digital lines, a selection dialog will appear after clicking on the [Assign] button.
- Eye X & Y (and Joystick X & Y) must be assigned on the same board. Otherwise, an error message will be displayed at the start of a task.
- Multiple digital lines can be assigned to Reward and Behavioral Codes. To select multiple ports/lines, drag on the panel or use SHIFT + CLICK and CTRL + CLICK combinations.
- To send the eventcodes that NIMH ML generates to other devices, assign Behavioral Codes (multiple lines) and Strobe Bit (one line). NIMH ML always records eventcodes, regardless of the assignment of Behavioral Codes and Strobe Bit.
- When TTL is assigned initially, the output is HIGH. To invert its polarity, double-click the assigned TTL on the [Signal Type] panel. A tilde prefix (e.g., {~TTL1}) indicates that the output will be LOW.

- Other device settings (USB, etc.)
- Some devices, such as mouse, touchscreen, USB joystick and TCP/IP eye tracker, do not have an analog-to-digital converter, but NIMH ML monitors and records input from them every milliseconds based on a software timer.
- The devices listed here have priority over voltage-generating devices connected to the DAQ board. If a USB joystick or TCP/IP eye tracker is selected here, it will overwrite the one connected to the DAQ voltage channels.
- To read out High Frequency, Webcam and Voice from the data files, use the mlreadsignal function.
- Reload device lists (): Click and reload device lists after plugging in USB devices (NI board, joystick, webcam, etc.)
- Audio Engine: See "Audio Engine" for details.
- High-freq Sampling
- Choose an NI board to run with a sample rate faster than 1 kHz here. The selected NI board should be used only for "High Frequency" channels in the I/O menu. To read out "High Frequency" channels from data files, use the mlreadsignal function.
- Mouse / Key
- To sample mouse and key input in millisecond resolution and store to the data file, check on the box here and type the key codes to track. To see the Keycode Table, click [...].
- Touchscreen
- This option should be selected to store touch tracking data to the data file.
- Set the number of touches to track simultaneously. Additional touches will add more columns to the data, like [x1 y1 x2 y2 x3 y3 ...].
- USB / Network Joystick
- Choose the number of joystick buttons to record. Joystick buttons will be stored under the AnalogData.Button field in the data file and numbered from 11 (e.g., Btn11).
- For UDP/TCP joystick programming, see "Networked Eye Tracker & Joystick"
- Webcam
- Export: This menu determines how to save recorded videos. There are three options: 1) export to data file with no compression, 2) export to data file (mp4) and 3) export as separate files (mp4).
- The size of the video data can be huge, when saved without compression. Do not choose a large video resolution unnecessarily.
- Compressing to MP4 occurs at the end of each trial. If the size of the video is large, it may take longer than the intertrial interval and delay the next trial.
- If the webcam supports MJPEG, frame images are delivered already compressed. Therefore, by selecting "export with no compression", the extra processing time for MP4 compression can be avoided while keeping the data size small. However, the compression rate of MJPEG is not as good as MP4.

- When exporting as separate files (MP4), the frame rate of the saved MP4 is set to the median of the capture intervals. The original timestamps are still kept in the data file and can be read with mlreadsignal.
- Use the mlreadsignal function, to read recorded videos from data files. The videos can be extracted from data files and attached back to them with mlexportwebcam and mlimportwebcam, respectively.
- TCP/IP Eye Tracker: See "TCP/IP Eye Tracker" for details.
- Reward via Bluetooth: This menu is to set a serial port assigned to the Bluetooth radio. See "Triggering a remote reward device via Bluetooth" for details.
- Voice Recording
- A sound board can be used to record ambient sounds via a microphone. Use the mlreadsignal function, to read out recorded audio from data files.
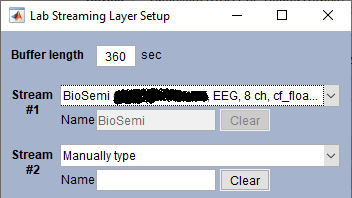
- Lab Streaming Layer
- The lab streaming layer (LSL) is a system for the unified collection of time series data streamed over the network. NIMH ML can receive data from LSL and save in its data file.
- The buffer length (in seconds) must be sufficiently longer than the length of one trial.
- The name of the stream is used as a unique identifier. Choose one of the searched streams on the menu or type a name manually.
- The sample rate of the LSL streams may not be 1 kHz, so the timestamp of each sample is stored together. The first column of the data saved under the AnalogData.LSL field is the timestamp.
- [I/O Test] button: Opens a test panel for the assigned I/O. See "I/O Test" for details.
- AI sample rate: NIMH ML always acquires samples at 1 kHz, regardless of this setting, so that the time resolution of online monitoring may not be affected. Recorded signals are down-sampled just before saved to the data file in order to reduce the file size, if this number is set below 1000. When ITI recording is on, this is fixed to 1000.
- AI configuration: Sets the AI grounding configuration of the DAQ board. See "Analog Input Ground Configuration" in the "NI Multifunction I/O Device" menu.
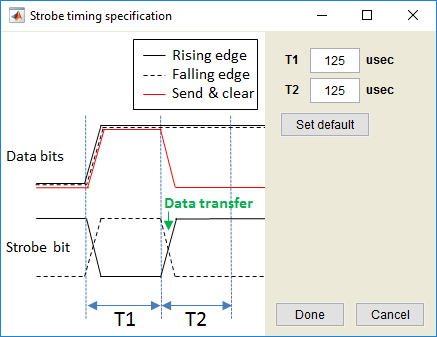
- Strobe: Set whether the Behavioral Codes (event markers) will be sent on the rising-edge or falling-edge of the Strobe Bit. There is also a third option that does not require the Strobe Bit ("Send and Clear") for systems that capture the codes based on change detection.
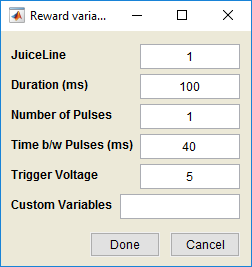
- [Spec] button: Use this button to change the duration of Strobe Bit pulses. See the figure below.
- [Test] button: Sends a test Strobe Bit.
- Reward
- [Args] button: Edit the reward function arguments (i.e., goodmonkey) for testing.
- [Edit] button: Opens the current reward function. By default, it opens reward_function.m in the ML directory. If there is a file in the current task directory with the same name, the one in the task directory has a priority.
- Reward polarity: Sets whether the reward device will be triggered on a TTL HIGH or LOW signal.
- [Test] button: Sends out a test reward pulse.
- Eye calibration & Joy calibration: See "Calibrating Eye/Joystick Signals".
- [Reset] button: Clears the calibration matrix of the currently selected method.
- [Calibrate / Re-calibrate] button: Opens the selected calibration tool.
- [Import] calibration button: Copies the calibration matrix of the currently selected eye & method from another configuration file.
- Eye [Auto drift correction]: If this number is larger than 0, the positions of the fixation target and the gaze are compared at the end of each trial. If there is a difference, the calibration matrix is updated to translate the eye position toward the fixation target according to the proportion that is set here.
- Task
- [Alert] button: See "Alert function".
- On error: This menu determines how to handle error trials. See "Task flow control" for details.
- Conditions: This menu determines the method to select the next condition. See "Task flow control" for details.
- Blocks: This menu is identical in logic to the Conditions menu above, except that it is used to choose the next block. See "Task flow control" for details.
- Inter-trial interval (ITI): Enter the desired inter-trial interval (in milliseconds).
- During ITI,
- Show traces: Determines whether to display a summary (stimuli used in the trial and traces of input signals) on the control screen during the ITI.
- Record signals: Determines whether to record input signals during the ITI. If this option is selected, the ITI start time is regarded as the beginning of the next trial.
- User plot function: Name of a MATLAB function that will draw to the space normally occupied by the reaction time histogram on the control screen. Users can use this function to display results of online trial-by-trial analysis. The function takes the TrialRecord structure and optionally MLConfig as input and return nothing.
function userplot(TrialRecord)            % one-argument version
function userplot(TrialRecord, MLConfig)  % two-argument version