TCP/IP Eye Tracker
Following products are currently supported for UDP or TCP data transfer.
- Arrington Research's ViewPoint EyeTrackers
- SR Research's EyeLink trackers
- ISCAN eye trackers
Thomas RECORDING TOM-rs(support discontinued due to unnotified protocal changes)- Tobii Pro (only in NIMH ML v2.2)
- My EyeTracker (interface for custom UDP/TCP eye trackers)
- General setup
- Connect the eye tracker system and the NIMH ML computer with a LAN cable.
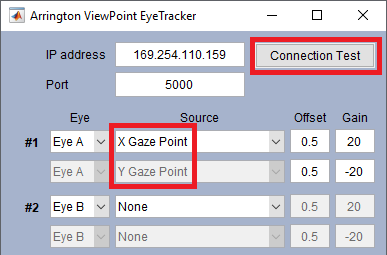
- Type the IP address and port number of the eye tracker system in the NIMH ML TCP/IP eye tracker menu. Also put the IP address and port number of the NIMH ML computer in the eye tracker system.
- Test the connection by clicking [Connection Test]. You may need to turn on the network discovery option of Windows or add new rules in Windows Firewall advanced settings to open the designated port.

- The first two signal sources must be X & Y gaze points as shown in the figure above. Some GUI components are disabled, to enforce it.
- NIMH ML needs X & Y values from the eye tracker to be in a range of -10 to 10. Adjust the offset and gain on the right side of each channel, if necessary.
- Disable Nagle's algorithm. See the instructions below.
- Disabling Nagle's algorithm
- Open the registry editor: click Start > Run (or Window + R) and type regedit.
- Browse to: HKEY_LOCAL_MACHINE\SYSTEM\CurrentControlSet\Services\Tcpip\Parameters\Interfaces
- Select the network interface to modify by finding the IP address assigned to the network adapter.
- Create two new entries for the interface. Do this by right-clicking the interface in the left pane and going to New > DWORD (32-bit) Value. Name them "TcpAckFrequency" and "TCPNoDelay" (case sensitive), respectively.
- Double-click each new entry and set its ‘Value Data’ to "1". Leave "Hexadecimal" checked under ‘Base’.
- Exit the registry editor and reboot.
- ISCAN UDP setup (for ISCAN users only)
- In the DQW "System Configuration" dialog, select the "TCP/IP I/O" tab.
- Check the "Output Active" box to enable the TCP/IP output.
- Specify the receiving party's IP address and port using the edit boxes and rollers. Click on "OK".
- Click on the "Options" button until the "Auxiliary Output Controls" panel appears as the lower left DQW screen. Then click on the "TCP/IP" tab if this is not already in the foreground.
- Be sure the IP address and port are correct for the destination computer. If not, go back to Step 1 and make changes.
- Two parameter banks with six parameters each, for a total of up to 12 parameters may be output with each data sample. To begin, select "Param Bank" 1 and fill the channels (01 to 06) with the desired parameters by selecting from the pop up list activated by clicking on the "..." button to the right of each channel. Fill the channels in order and be sure that unused channels have parameter "................" selected to minimize data transmission time. If more than 6 parameters are desired, select "Param Bank" 2 and proceed as above to fill in channels 07 to 12.
- With the above steps completed, whenever "Track Active" is enabled a data packet will be output via the specified port for each system data sample. The data packet will consist of each of the non-blank channel data values for the parameters specified in channel order (01 to 12).
- Enter the port number. The number should be the same as the one you put in the DQW software. Let DQW send out packets and test the reception by clicking the "Connection Test" button.
- If the connection test fails, see if the inbound UDP traffic for the specified port is allowed. Go to the [Advanced settings] of [Windows Defender Firewall] and add a new inbound rule for the UDP port.
- Make sure that the first two parameters selected in DQW are horizontal and vertical eye positions, respectively. It is up to the DQW software which parameters are sent. NIMH ML has no choice over this and what it shows on its menu is just for the display purpose. If the "Binocular" option is selected, the 3rd and 4th parameters of DQW should be horizontal and vertical positions of the second eye as well.
- To record additional paramters, add them in DQW and change the corresponding channel in NIMH ML to "As defined in DQW".
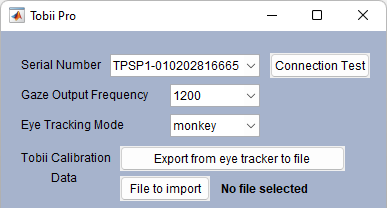
- Tobii Pro setup (for Tobii Pro users only)
- Before starting NIMH ML, Tobii Pro eye trackers must be connected to the computer and turned on. If they do not show up on the menu, try refreshing device lists (click
 on the [Other device settings] menu).
 - [Gaze Output Frequency] and [Eye Tracking Mode] show only options that are supported by the chosen eye tracker.
- Tobii Calibration Data: User calibration performed with Tobii's software can be exported to a file. To apply the calibration data every time when running tasks, choose the file by clicking the [File to import] button. The Eye Tracking Mode of the importing data must be the same as the current Eye Tracking Mode.
- "Eye openness" signals are available only when the [Eye Tracking Mode] is "human".
Users need to disable Nagle's algorithm as described below, to get the maximum TCP/IP performance. Nagle's algorithm is turned on, by default, in Windows.
DQW software versions starting with 1.21E allow the user to specify and output a set of available parameters via a standard network port using the TCP/IP protocol in real-time. The interface is connectionless UDP (User Datagram Protocol), meaning data will be sent to the specified IP address and port without handshaking or knowledge of the receiving party's status. Since packet loss occurs very often in UDP connection, it is recommended to use a direct cable connection rather than route via an institutional network or a hub.
1) To enable the TCP/IP capability in DQW
2) The ISCAN eye tracker menu in NIMH ML
