bhv_code
This function assigns string labels to numeric behavioral codes.
Syntax:
- bhv_code(code_number1, code_name1, code_number2, code_name2, ...);
Example:
- bhv_code(10,
bhv_variable
- If the function is called multiple times for the same variable, only the value at the very last call is stored.
This function stores the current values of variables to the data file.
Syntax:
- bhv_variable(var_name1, var_value1, var_name2, var_value2, ...);
Example:
- bhv_variable(
Remarks:
dashboard
- line_number: Ten lines of strings can be displayed.
- This function does not update the screen itself. For the text to be displayed, one of screen update commands (toggleobject, eyejoytrack, idle or run_scene) should be followed.
- The text stays on the screen even after the end of a trial, until it is modified by another dashboard call. To delete it, assign an empty string ('').
This function displays user texts on the control screen.
Syntax:
- dashboard(line_number, text, color);
dashboard(line_number, text, color, property1, value1, property2, value2, ...);
dashboard(line_number, text, property1, value1, property2, value2, ...);
Input arguments:
Example:
- dashboard(1,
Remarks:
editable
- type: '-file', '-dir', '-color', '-category' or '-range'
- Editable variables must be initialized in the timing script with specific values (numbers or characters). They cannot be initialized with other variables or return values of functions.
- Variables with no type should be logical or double with 6 elements or fewer.
- The type argument allows users to invoke MATLAB GUI controls to pick up a filename, a directory name or a color.
- The variable types for '-file' and '-dir' should be char.
- The '-color' variable should be a 1-by-3 vector, [R G B], between 0 and 1.
- The '-category' type must be a cell char array. Its last element is the currently selected item.
- The '-range' type must be a 1-by-4 vector, [min max step value]. Its last element is the currently determined value.
- For editable variables, trial-by-trial change histories are recorded in the data file. Check the VariableChanges field in the data file.
- See the 'task\runtime v1\9 editable demo' directory for more examples.
- Editable variables can be accessed in the user functions (e.g., userloop), like TrialRecord.Editable.var_name. See 'task\userloop\3 access editables from userloop'.
- 'reward_dur' is an editable, by default. It is inherited from the original MonkeyLogic. The value of reward_dur can be adjusted with the '-' and '+' keys by 10 (msec).
This function registers variables to the edit menu.
Syntax:
- editable(var_name1, var_name2, ...);
editable(type, var_name);
editable(type, {var_name1, var_name2, ...});
Input arguments:
Example:
- editable(
Remarks:
var1 = 1000;
editable('var1' ); % okay
var1 = 1000;
var2 = var1; % initialized with another variable
editable('var2' ); % error!!!
escape_screen
This function pauses the task after the current trial.
Syntax:
- escape_screen;
eventmarker
This function marks the current time with eventcodes. The eventcodes can also be sent to external devices, if Behavioral Codes and Strobe Bit are assigned on the main menu I/O panel.
To more accurately mark onset times of stimuli or rewards, use the eventmarker option of toggleobject and goodmonkey or the eventcode argument of run_scene, instead of this function.
Syntax:
- eventmarker(eventcodes);
Example:
- eventmarker([10 20 30]);
eye_position / eye2_position / joystick_position / joystick2_position
These functions return the current eye or joystick position. The return values are in degrees.
Syntax:
- xy_deg = eye_position;
[x_deg y_deg] = eye_position;
forced_eye_drift_correction
- origin: [x y] in degrees
- eye_num: 1 for eye1 (default), 2 for eye2
- In case the origin argument is not provided or is empty, this function determines the new origin based on these rules.
- The position of the new origin will be recorded in the VariableChanges field of the data file at the end of each trial.
This function translates the current eye calibration grid to a new origin.
Syntax:
- forced_eye_drift_correction;
forced_eye_drift_correction(origin);
forced_eye_drift_correction(origin, eye_num);
Input arguments:
Example:
- forced_eye_drift_correction;
Remarks:
- [0 0], if there is no visual TaskObject on the screen
- The position of the visual TaskObject, if there is only one object on the screen
- The position of the visual TaskObject closest to the current eye position, if there are multiple objects on the screen
get_analog_data
- sig_name: Case-insensitive.
- 'eye'
- 'eye2'
- 'eyeextra' (extra eye data received via TCP/IP)
- 'joy' or 'joystick'
- 'joy2' or 'joystick2'
- 'touch'
- 'mouse'
- 'mousebutton'
- 'key'
- 'gen#' or 'general#' (e.g., 'gen1', 'general1')
- 'btn#' or 'button#' (e.g., 'btn1', 'button1')
- 'high#' or 'highfrequency#' (e.g., 'high1', 'highfrequency1')
- 'voice'
- 'lsl#' (data received from the lab streaming layer)
- num_samples: Number of samples to return. 1 by default.
- data is an n-by-m matrix where n is the number of samples and m is the number of channels, depending on the signal type.
- sample_rate is the actual sample rate of the signal. See the remarks below for more information.
- This function takes a snapshot of the most recently acquired data backward in time and returns immediately.
- The size of data can be less than num_samples, if the number of recorded samples is small.
- Check sample_rate for the actual sample rate of the data. Most analog signals are sampled at 1 kHz, regardless of the [AI sample rate] setting on the main menu. High frequency channels, voice and the lab streaming layer are sampled at their own rates, not at 1 kHz.
This function returns the most recently acquired analog samples of the specified signal.
Syntax:
- data = get_analog_data(sig_name);
data = get_analog_data(sig_name, num_samples);
[data, sample_rate] = get_analog_data(__);
Input arguments:
Return values:
Example:
- data = get_analog_data(
Remarks:
get_object_duration
This function returns the durations of MOV and SND objects.
Syntax:
- duration = get_object_duration(taskobjects);
Example:
- duration = get_object_duration([1 2]);
getkeypress
- To retrieve the scancode of a particular key, call the kbdkeycode function on the MATLAB command window.
This function waits for a key input.
Syntax:
- [scancode, rt] = getkeypress(max_time);
Remarks:
goodmonkey
- duration: In milliseconds
- options: Case-insensitive. All options should be paired with values.
- NumReward - Number of drops
- PauseTime - Interval between drops, in milliseconds
- TriggerVal - Triggering voltage, for analogoutput only
- JuiceLine - Reward channel to trigger, for digital output only. Multiple lines need to be assigned to Reward in the Input/Output menu.
- EventMarker - Behavioral(s) code to stamp for each drop. Multiple codes can be given. For example, [10 20 30] will mark 10 for the 1st drop, 20 for the 2nd and 30 for the 3rd.
- NonBlocking - Deliver reward in the background so that the task is not blocked.
- 0 (blocking, by default)
- 1 (non-blocking, yield to other threads)
- 2 (non-blocking, do not yield, more precise timing)
This function initiates timed reward pulses to reward devices.
Syntax:
- goodmonkey(duration);
goodmonkey(duration, option1, value1, option2, value2, ...);
Input arguments:
Example:
- goodmonkey(100,
hotkey
- key: one letter among '`1234567890-=qwertyuiop[]\asdfghjkl;''zxcvbnm,./'
or 'esc', 'rarr', 'larr', 'uarr', 'darr', 'numrarr', 'numlarr', 'numuarr', 'numdarr', 'space', 'bksp', 'f1' - 'f12'
This function defines a key macro.
Syntax:
- hotkey(key, things-to-do);
Input arguments:
Example:
- hotkey(
idle
- duration: In milliseconds
- screen_color: New background color, [R G B]; can be an empty vector ([]) if the change is not necessary
- eventcode: Code(s) to stamp when the screen color changes
- When the screen_color is given, the background color changes for the duration and goes back to the initial color. See set_bgcolor, for how to change it permanently.
Syntax:
- idle(duration);
idle(duration, screen_color);
idle(duration, screen_color, eventcodes);
Input arguments:
Remarks:
include
- The script names must be statsic strings. They cannot be determined dynamically.
This function includes other script files into the timing script.
Syntax:
- include(filepath1, filepath2, ...);
Example:
- include(
Remarks:
istouching
- tf: true if the screen is being touched. Otherwise, false.
Syntax:
- tf = istouching;
Return values:
mouse_position
- buttons: A 1-by-2 logical vector, [left right]; 1 - clicked, 0 - not clicked
- keys: States of keys registered in the main menu, a 1-by-n logical vector; 1 - pressed, 0 - not pressed
- If any argument is provided, the function returns Windows coordinates of the mouse cursor ("raw" values). Otherwise, the return value is in degrees.
This function returns the current mouse position and the button/key state.
Syntax:
- xy_deg = mouse_position;
[xy_deg, buttons, keys] = mouse_position;
xy = mouse_position('raw');
Return values:
Remarks:
reposition_object
- xy_degs: An n-by-2 matrix.
This function moves graphic objects to new locations.
Syntax:
- reposition_object(taskobjects, xy_degs);
Input arguments:
Example:
- reposition_object([1 2], [-5 0; 5 0]);
rescale_object
- scale: Ratio. 1 indicates the original size. Use two-element vectors to apply different scales to width and height.
This function changes the size of graphic objects to the given scale.
Syntax:
- rescale_object(taskobjects, scale);
Input arguments:
Example:
- rescale_object([1 2], 2);
rotate_object
- angle: In degrees.
This function rotates graphic objects.
Syntax:
- rotate_object(taskobjects, angle);
Input arguments:
Example:
- rotate_object([1 2], [45 60]);
rewind_object
- position: In milliseconds. 0, by default, if not given.
This function moves the playback positions of MOV and SND TaskObjects.
Syntax:
- rewind_object(taskobjects);
rewind_object(taskobjects, position);
Input arguments:
Example:
- rewind_object([1 2]);
set_bgcolor
- bgcolor: New background color, [R G B]; can be an empty vector ([]) to switch back to the original background
- To make this color change shown, one of screen update commands (toggleobject, eyejoytrack, idle or run_scene) should be followed
This function changes the background color of the subject screen.
Syntax:
- set_bgcolor(bgcolor);
Input arguments:
Example:
- set_bgcolor([1 0 0]);
Remarks:
set_iti
- If this function is not called, the ITI is reset to the value provided on the main menu.
This function overwrites the default inter-trial interval set on the main menu.
Syntax:
- set_iti(duration);
Remarks:
touch_position
- xy_deg: a 1-by-(2 * # of touches) vector, like [x1 y1 x2 y2 x3 y3 ...]. If the touchscreen is not enabled, it is empty.
- The total number of touches that can be simultaneously tracked can be set on the main menu. It is also dependent on the touchscreen's capability.
- Untouched/detached coordinates are filled with NaN.
This function returns xy coordinates of the places that are currently being touched.
Syntax:
- xy_deg = touch_position;
Return values:
Remarks:
trialerror
- Error code:
- 0 - Correct
- 1 - No response
- 2 - Late response
- 3 - Break fixation
- 4 - No fixation
- 5 - Early response
- 6 - Incorrect
- 7 - Lever break
- 8 - Ignored
- 9 - Aborted
- The first syntax can be used to overwrite the default error labels. The input argument should be number/label pairs. This has to be done before calling the function again for marking an error code.
- The numeric code 0 always indicates a correct/succeeded trial, irrespective of its label.
This function records the error code of the current trial to the TrialRecord structure.
Syntax:
- trialerror(number1,string1,number2,string2, ...);
trialerror(number);
Example:
- trialerror(1,
trialerror(0);
Input arguments:
Remarks:
trialtime
This function returns the time elapsed from the trial start in milliseconds.
Syntax:
- time = trialtime;
user_text / user_warning
- user_text displays messages in blue and user_warning, in red.
This function displays user texts on the control screen GUI at the end of a trial.
Syntax:
- user_text(message);
user_warning(message);
Remarks:
eyejoytrack
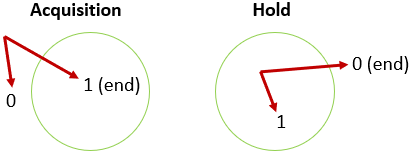
- tracking_type: Choose one according to the signal type and the behavior type (Acquisition or Hold). The difference between Acquisition and Hold is whether the XY input is outside the threshold window or inside at the beginning. eyejoytrack terminates immediately, if the signal crosses the threshold window. Otherwise, it runs for the entire duration.
- taskobject: TaskObject# (for eye, joystick, touch) or Button# (for button)
- threshold: The target window size (for eye, joystick, touch) or voltage threshold (for button). A scalar creates a circular window; and a 1-by-2 vector, a rectangular window. Multiple rectangular windows can be set with a matrix [w1 h1; w2 h2; ...].
- duration: In milliseconds
- For the usage of the additional return values (rt & t_resp), see Migrating from the Original MonkeyLogic, Reaction time.
- For Acquisition, multiple TaskObjects can be assigned as a vector. In that case, the return value is the ordinal number of the acquired target. Only one TaskObject should be used for Hold.
- For button input, use Button# from the main menu I/O panel, instead of TaskObject#. The threshold can be either a voltage level or an empty vector (default threshold). The default threshold is 3 for analog buttons and 0.5 for digital buttons.
- '~touchtarget' is a tracking type available for touch input only. eyejoytrack will return 1 when the outside of the threshold window is touched.
- 'acquirefunc' and 'holdfunc' allow using a user function as a signal source. The user function should return true (inside the threshold window) or false (outside the threshold) to mimic the Acquisition and Hold behavior. The threshold variable (input_args below) is used as input arguments to the user function. Use a cell to provide multiple arguments to the function.
- To monitor more than one behavior types simultaneously, you must use the syntax for multi-tracking (Example 2) and put them in one eyejoytrack command. If multiple tracking types are provided, eyejoytrack returns a vector, in which each element indicates the success state of those tracking types. eyejoytrack will stop when threshold crossing occurs in any of them.
This function monitors behavioral signal inputs.
Syntax:
- ontarget = eyejoytrack(tracking_type, taskobject(s), threshold, duration);
Input arguments:
| Signal type | Acquisition | Hold | Inverse acquisition |
| eye | 'acquirefix' | 'holdfix' | |
| eye2 | 'acquirefix2' | 'holdfix2' | |
| joystick | 'acquiretarget' | 'holdtarget' | |
| joystick2 | 'acquiretarget2' | 'holdtarget2' | |
| touch | 'touchtarget' | 'releasetarget' | '~touchtarget' |
| button | 'acquiretouch' | 'holdtouch' | |
| function | 'acquirefunc' | 'holdfunc' |
Example 1: single tracking
- ontarget = eyejoytrack(
Example 2: multi-tracking
- ontarget = eyejoytrack(
Remarks:
ontarget = eyejoytrack('acquirefix' , [2 3 5], 3, 5000); % eyejoytrack will return 3, if the eye
% fixates on TaskObject#5, because TaskObject#5 is the third object in the list.
ontarget = eyejoytrack('acquiretouch' , 2, 5, 500); % Button #2; input voltage should be larger
% than 5V when the button is pushed.
ontarget = eyejoytrack('holdtouch' , 1, [], 500); % Button #1; use the default threshold.
ontarget = eyejoytrack('acquirefunc' , @function_handle, input_args, duration);
ontarget = eyejoytrack('acquirefix' , 1, 3, 'holdtouch' , 1, [], 2000); % track for 2 sec
| Eye fixation | Button state | eyejoytrack returns | ontarget |
| not acquired | released | immediately on release | [0 0] |
| not acquired | held down | after 2 sec | [0 1] |
| acquired | released | immediately on fixation/release | [1 0] |
| acquired | held down | immediately on fixation | [1 1] |
set_frame_event
- frame_numbers & eventcodes: The lengths of both vectors must be the same.
This function marks the time with eventcodes when particular frames are presented.
Syntax:
- set_frame_event(taskobject, frame_numbers, eventcodes);
Input arguments:
set_frame_order
- frame_order: If empty, the frames are reset to the original order.
This function rearranges the order of movie frames.
Syntax:
- set_frame_event(taskobject, frame_order);
Input arguments:
set_object_path
- To show the motion, either idle or eyejoytrack needs to be called.
This function translates a graphic object through a given path.
Syntax:
- set_object_path(taskobject, xy_deg);
set_object_path(taskobject, x_deg, y_deg);
Remarks:
showcursor / showcursor2
- status: Can be 'on'/'off' (char) or true/false (logical).
- Turning off the cursor when it is already off removes the cursor from the control screen as well.
- For the scene framework (v2), use joy_.showcursor() and joy2_.showcursor(), instead.
This function turns on and off the joystick cursor on the subject screen. By default, it is off. showcursor2 is for the 2nd joystick.
Syntax:
- showcursor(status);
Input arguments:
Example:
- showcursor(true);
Remarks:
showtouch
- status: Can be 'on'/'off' (char) or true/false (logical).
- Turning off the cursor when it is already off removes the cursor from the control screen as well.
- For the scene framework (v2), use touch_.showcursor().
This function turns on and off the touch cursor on the subject screen. By default, it is off.
Syntax:
- showtouch(status);
Input arguments:
Example:
- showtouch(true);
Remarks:
toggleobject
- options: Case-insensitive. All options should be paired with values.
- EventMarker - Behavioral code(s) to stamp at the presentation of the taskobject.
- Status - 'on' or 'off'. Manually determines the status of the taskobjects
- MovieStartFrame, MovieStep, StartPosition, PositionStep - These options are deprecated. To adjust the speed of movies, change their frame time with movie editing software.
- fliptime: The trialtime at which the screen "flip" occurs. In milliseconds.
- If only non-visual stimuli (SND, STM and TTL) are provided, they are presented immediately without waiting for the screen flip.
- When non-visual and visual stimuli are given together, the presentation of non-visual stimuli is synchronized with the screen flip timing.
- If the Status option is not used, the state of each object is toggled individually.
- Do not put the stimuli that should be presented simultaneously in separate toggleobject commands.
This function turns on and off TaskObjects.
Syntax:
- fliptime = toggleobject(taskobjects);
fliptime = toggleobject(taskobjects, option1, value1, option2, value2, ...);
Input arguments:
Return values:
Example:
- toggleobject([1 2],
Remarks:
% Example 1
toggleobject(1, 'status' , 'off' ); % TaskObject#1 OFF
toggleobject(2, 'status' , 'on' ); % TaskObject#2 ON
toggleobject([1 2], 'status' , 'on' ); % Both TaskObject#1 and #2 are ON
% Example 2
toggleobject(1, 'status' , 'off' );
toggleobject(2, 'status' , 'on' );
toggleobject([1 2]); % TaskObject#1 ON; TaskObject#2 OFF
% Example 1
toggleobject(1);
toggleobject(2);      % TaskObject#2 is turned on one frame later than TaskObject#1

% Example 2
toggleobject([1 2]);  % TaskObject#1 & #2 are turned on simultaneously
create_scene
- taskobjects: TaskObject# to present during the scene; can be a vector of multiple TaskObjects
- The "adapter" argument provided to create_scene is important, because run_scene ends when that adapter stops.
- TaskObjects inserted to the scene by create_scene are terminated at the end of the scene, unless they are inserted in the next scene as well.
- Also see How to create adapter chains.
This function collects the information of the adapter chain for the offline trial replay.
Syntax:
- scene = create_scene(adapter, taskobjects);
Input arguments:
Example:
- fix = SingleTarget(eye_);
fix.Target = 1;
Remarks:
run_scene
- scene: This is the return value of create_scene.
- eventcodes: Eventcode(s) to send out when the first frame of the scene is presented.
- fliptime: The trialtime (in milliseconds) at which the first frame of the screen is presented
- This function does not end until the top-most adapter in the chain (the one provided to create_scene) stops. For the stop conditions of adapters, see the description of each adapter.
This function runs the adapter chain.
Syntax:
- fliptime = run_scene(scene, eventcodes);
Input arguments:
Return values:
Example:
- box = BoxGraphic(null_);
box.List = { [1 1 1], [1 1 1], 1, [0 0] };
fix = SingleTarget(eye_);
fix.Target = box;
Remarks:
EyeTracker, Eye2Tracker, JoyTracker, Joy2Tracker, TouchTracker, ButtonTracker, MouseTracker, NullTracker
- Success: true if there are data samples read; otherwise, false
- Trackers never stop the scene and should be used with other adapters.
- Signal: The name of the signal that it reads ('Eye', 'Eye2', 'Joystick', 'Joystick2', 'Touch', 'Button', 'Mouse', 'Null')
- Screen: The instance of the mlscreen object
- DAQ: Data acquisition object
- TaskObject: Task objects
- CalFun: Calibration object
- XYData: An n-by-2 XY position matrix in screen pixels. In case of touch, 2 more columns are added for each additional touch (e.g., [x1 y1 x2 y2 ...]) and they are filled with [NaN NaN] when there is no touch.
- ClickData: States of buttons; logical true (pressed) or false (released)
- KeyInput: States of keys specified in the Mouse/Key menu; logical true (pressed) or false (released)
- LastSamplePosition: Cumulative number of samples acquired before XYData, MouseData and ClickData were read. So the total number of samples read so far is LastSamplePosition + size(XYData,1).
Users do not need to create tracker objects. They are pre-defined with reserved names in the timing script: eye_, eye2_, joy_, joy2_, touch_, button_, mouse_ and null_.
Success Condition:
Stop Condition:
Tracker Properties:
All trackers have common properties like the following.
Every adapter in a chain can access the above objects via its Tracker property, which is a convenient way to get the information about screens, data sources and TaskObjects from the inside of the adapter.
- obj.Tracker.Signal
obj.Tracker.Screen
obj.Tracker.DAQ
obj.Tracker.TaskObject
obj.Tracker.CalFun
The trackers also have the following data fields for different types.
| eye_, eye2_ | joy_, joy2_ | touch_ | button_ | mouse_ | null_ |
| XYData LastSamplePosition |
XYData LastSamplePosition |
XYData LastSamplePosition |
ClickData LastSamplePosition |
XYData ClickData KeyInput LastSamplePosition |
These fields are continuously updated with data acquired during the previous frame (or data acquired before the scene start, if it is the very first frame of the scene). So, at a refresh rate of 60 Hz, about 16-17 samples are kept in each of them (except LastSamplePosition) from moment to moment.
The joystick cursors can be modified in the timing file via the following properties. Use joy2_ for the second joystick.
- joy_.TracerImage
Tracker Methods:
- joy_.showcursor(true);
Calling joy_.showcursor(false) or touch_.showcursor(false) one more time while the cursor is hidden removes the cursor from the control screen as well.
- button_.threshold(button#, buttonThreshold);
When a button is inverted with button_.invert(), the input from the button is saved as inverted in the data file. If you want to change the polarity of a button but not the saved values, use NotAdapter (see its usage example for details).
- mouse_.showcursor(false);
SingleTarget
- Success: true while the position of the XY tracker is within the threshold window; otherwise, false
- When Success becomes true
- Target: Graphic adapter, TaskObject# or a 2-element vector, [x y], in degrees
- Threshold: Size of the threshold window around the Target; a scalar (circle radius) or [width height] (rectangle) in degrees.
- Color: Color of the threshold window shown on the control screen; [R G B]
- Time: trialtime when the XY tracker crossed the threshold window; in milliseconds
- setTarget(graphic_obj, index): If the graphic adapter contains multiple objects, use the optional index argument to indicate which object should be used.
- To prevent a jitter from being detected as a fixation, SingleTarget does not change its Success state until the tracker stays within the threshold window at least for one frame.
- If Target is a graphic adapter or a TaskObject, the target graphic will appear and disappear automatically. When [x y] is the target, nothing is displayed by SingleTarget.
- To implement a moving target, SingleTarget's Target property must be empty. Use the Target property of CurveTracer instead, as shown in Example 2.
This adapter tells whether the position of a XY tracker (eye_, joy_, touch_ and mouse_) is within or outside the threshold window.
Success Condition:
Stop Condition:
Input properties:
Output properties:
Methods:
Example 1:
- box = BoxGraphic(null_);
box.List = { [1 0 0], [1 0 0], 2, [-5 0];
Example 2:
- box = BoxGraphic(null_);
box.List = { [1 0 0], [1 0 0], 2, [-5 0];
Example 3:
- box = BoxGraphic(null_);
box.List = { [1 1 1], [1 1 1], 2, [0 0] };
fix = SingleTarget(eye_);
fix.Target = [2 0];
Remarks:
MultiTarget
- Success: true when one target is chosen AND the choice is maintained for HoldTime
- When Success becomes true
- When WaitTime is expired without any fixation attempt or, if AllowFixBreak is false, when the acquired fixation is broken before HoldTime passes
- When AllowEarlyFix is false and a fixation is made before the first frame of the scene
- Target: Graphic adapter(s), TaskObjects, or an n-by-2 matrix ([x1 y1; x2 y2; ...]) in degrees
- Threshold: Radius or [width height] of the detection window around the Target; in degrees
- WaitTime: Maximum time to wait until one of the targets is chosen; in milliseconds
- HoldTime: Duration for which the choice should be maintained; in milliseconds
- Color: Color of the threshold window shown on the control screen; [R G B]
- AllowFixBreak: true or false (by default); if true, fixation break is allowed before commiting to one target
- TurnOffUnchosen: true (by default) or false to determine whether to turn off unchosen targets during HoldTime. It is meaningful only when AllowFixBreak is false.
- AllowEarlyFix: true (by default) or false. When it is false, the scene stops immediately if a fixation is made before the scene starts.
- Waiting: true if the choice was never made
- AcquiredTime: trialtime when the XY tracker crossed the threshold window of the chosen target
- RT: Reaction (or response) time, which is the difference between the time of the first frame of the scene and the AcquiredTime
- ChosenTarget: TaskObject#, if the targets were TaskObjects; the ordinal number of the chosen target, if the targets were graphic adapters or XY coordinates. This property is set only when MultiTarget succeeded.
- ChoiceHistory: [ChosenTarget1 AcquiredTime1; ChosenTarget2 AcquiredTime2; ...]; this property is set whether MultiTarget succeeded or not.
- setTarget(graphic_obj, index): This method assigns the first target graphic adapter. If the adapter contains multiple objects and only some of them should be included, use the optional index argument.
- addTarget(graphic_obj, index): Any additional adapter target should be assigned with this method.
- To prevent a jitter from being detected as a fixation, MultiTarget does not change its Waiting state until the tracker stays within the threshold window at least for one frame.
- When stacking multiple adapter targets, the first adapter is assigned with setTarget() but subsequent assigments must use addTarget(). See Example 2 above.
- The meaning of ChosenTarget is different, depending on the Target type. If the targets are TaskObjects, the number that ChosenTarget returns is TaskObject#; for graphic adapters and XY coordinates, it is the ordinal number of the selected target.
- MultiTarget can work with one target, when a graphic adapter is used as the target. For TaskObjects or XY coordinates, it requires at least two targets.
This adapter monitors the capture of an XY tracker for multiple targets.
Success Condition:
Stop Condition:
Input properties:
Output properties:
Methods:
Example 1:
- box = BoxGraphic(null_);
box.List = { [1 0 0], [1 0 0], 2, [5 5];
Example 2:
- box = BoxGraphic(null_);
box.List = { [1 0 0], [1 0 0], 2, [5 5] };
Remarks:
WaitThenHold
- Success: true if the Success of the child adapter becomes true within WaitTime AND stays true for HoldTime; false, until then.
- When Success becomes true
- When WaitTime is over without any fixation attempt or when the acquired fixation is broken before HoldTime passes
- When AllowEarlyFix is false and a fixation is made before the first frame of the scene
- WaitTime: Maximum time to wait until the XY tracker enters the threshold window; in milliseconds
- HoldTime: Duration for which the fixation should be held; in milliseconds
- AllowEarlyFix: true (by default) or false. When it is false, the scene stops immediately if a fixation is made before the scene starts.
- Waiting: true if the fixation is never made
- AcquiredTime: trialtime when the fixation is made
- RT: Reaction (or response) time, which is the difference between the time of the first frame of the scene and the AcquiredTime
- Although SingleTarget is used as an example, WaitThenHold can track any adapter in which the Success property indicates its state change. See the "task\runtime v2\17 multi-input tracking 1" example.
This adapter checks if the Success state of the child adapter becomes true within WaitTime and stays true for HoldTime. It can be used to test if eye fixation or touch is acquired and maintained.
Success Condition:
Stop Condition:
Input properties:
Output properties:
Example:
- box = BoxGraphic(null_);
box.List = { [1 1 1], [1 1 1], 1, [0 0] };
fix = SingleTarget(eye_);
fix.Target = box;
fix.Threshold = 3;
wth = WaitThenHold(fix);
wth.WaitTime = 5000;
wth.HoldTime = 500;
scene = create_scene(wth);
run_scene(scene);
Remarks:
FreeThenHold
- Success: true if the fixation is made, before WaitTime passes, and maintained for HoldTime; false, until then.
- When Success becomes true
- When WaitTime is over without a successful fixation
- When AllowEarlyFix is false and a fixation is made before the first frame of the scene
- WaitTime: Maximum time to allow trying fixation for; in milliseconds
- HoldTime: Duration for which the fixation should be held; in milliseconds.
- AllowEarlyFix: true (by default) or false. When it is false, the scene stops immediately if a fixation is made before the scene starts.
- BreakCount: Number of fixations that are made before the fixation succeeds or WaitTime is expired.
- AcquiredTime: trialtime when the last fixation is made (i.e., the time of the last fixation window crossing)
- RT: Reaction (or response) time, which is the difference between the time of the first frame of the scene and the AcquiredTime
- Although SingleTarget is used as an example, FreeThenHold can track any adapter in which the Success property indicates its state change.
This adapter is similar to WaitThenHold. The difference is that FreeThenHold allows breaking fixation and trying again, as long as WaitTime is not expired.
Success Condition:
Stop Condition:
Input properties:
Output properties:
Example:
- box = BoxGraphic(null_);
box.List = { [1 1 1], [1 1 1], 1, [0 0] };
fix = SingleTarget(eye_);
fix.Target = box;
fix.Threshold = 3;
fth = FreeThenHold(fix);
fth.WaitTime = 5000;
fth.HoldTime = 500;
scene = create_scene(fth);
run_scene(scene);
Remarks:
LooseHold
- Success: true when the Success property of the child adapter remains true for HoldTime; false, until then.
- When Success becomes true
- When the fixation is broken for longer than BreakTime
- HoldTime: Duration for which the fixation should be held; in milliseconds
- BreakTime: Maximum duration to allow breaking fixation; in milliseconds
This adapter checks to see if the Success state of the child adapter stays true for HoldTime. It allows brief state changes (i.e., to be false), as long as the change is shorter than BreakTime. This is useful to test if the previously acquired eye fixation is maintained while allowing for temporary breaks due to blinking.
Success Condition:
Stop Condition:
Input properties:
Example:
- box = BoxGraphic(null_);
box.List = { [1 1 1], [1 1 1], 1, [0 0] };
fix = SingleTarget(eye_);
fix.Target = box;
fix.Threshold = 3;
wth = WaitThenHold(fix);
wth.WaitTime = 5000;
wth.HoldTime = 0;
scene1 = create_scene(wth);
lh = LooseHold(fix);
lh.HoldTime = 3000;
lh.BreakTime = 500;
scene2 = create_scene(lh);
run_scene(scene1);
ComplementaryWindow
- Success: true if the outside of the window is touched; false, otherwise.
- When Success becomes true
- Target: TaskObject# or [x y] coordinates in degrees. Either SingleTarget or MultiTarget object can be assigned instead, to copy their target(s) and threshold (see the example below).
- Threshold: Size of the window; a scalar or [w h] in degrees
- This adapter works with touch input only. For the other signals, adding NotAdapter after SingleTarget will do the same.
This adapter sets a complementary window around the target(s) to detect XY input outside the window.
Success Condition:
Stop Condition:
Input properties:
Example:
- box = BoxGraphic(null_);
box.List = { [1 1 1], [1 1 1], 1, [0 0] };
fix = SingleTarget(touch_);
fix.Target = box;
fix.Threshold = 3;
wth = WaitThenHold(fix);
wth.WaitTime = 5000;
wth.HoldTime = 0;
out = ComplementaryWindow(touch_);
out.Target = fix;
ac = AllContinue(wth);
ac.add(out);
dashboard(1,
Remarks:
BlinkDetector
- Success: The same value as the child adapter's Success
- When the forbidden area is trespassed (if StopOnDetection is true); or when the child adapter stops (if StopOnDetection is false)
- XRange: [left right] of the forbidden area in degrees
- YRange: [bottom top] of the forbidden area in degrees
- StopOnDetection: If this property is true (by default), the adapter stops when the forbidden area is trespassed.
- Detected: true, if the XY tracker entered the forbidden area; false, otherwise
- Users need to know what numbers they get when blinking occurs and set XRange and YRange appropriately. Note that those numbers are calibrated values, not the raw values from the eye tracker/joystick.
This adapter checks if the XY tracker enters a specified area during the scene. Since eye trackers typically send out some extreme values for blinks, it can be used to detect the blinks by setting a forbidden area around the extreme coordinates.
Success Condition:
Stop Condition:
Input properties:
Output properties:
Example:
- fix = SingleTarget(eye_);
fix.Target = [0 0];
fix.Threshold = 3;
wth = WaitThenHold(fix);
wth.WaitTime = 5000;
wth.HoldTime = 500;
bd = BlinkDetector(wth);
bd.XRange = [80 Inf];
Remarks:
SingleButton
- Success: true while the button is pressed; false, otherwise.
- When Success becomes true
- Button: Button #
- TouchMode: true or false. See the remarks below.
- Time: trialtime when the button state changed for the last time; in milliseconds
- The responsiveness of SingleButton differs, depending on whether the input is analog or digital. For analog input, SingleButton does not change its Success state until the button is pressed/released for at least one frame, to prevent a jitter from being detected as a normal button press/release. For digital buttons that are less susceptible to noise, the Success state changes without waiting for one frame.
- To force SingleButton to change its Success state immediately for analog input as well, set the TouchMode property to true after assigning the Button number, like the following.
btn.Button = 1; btn.TouchMode = true;% After assigning Button - To make SingleButton respond to the button release, instead of the press, invert the input via ButtonTracker (button_) as below. The inverted button is colored in red on the control screen and treated as a button sending out 0 when pressed. Note that this makes the saved button signal inverted as well.
- The button threshold for analog input can be adjusted like the following.
This adapter checks if the specified button was pressed.
Success Condition:
Stop Condition:
Input properties:
Output properties:
Example:
- btn = SingleButton(button_);
btn.Button = 1;
Remarks:
button_.invert(1); % Invert Button#1
button_.threshold(button#, buttonThreshold);
PulseCounter
- Success: true once a pulse is detected
- When Success becomes true
- Button: Button #
- Count: Number of pulses (or button presses)
- Unlike SingleButton, PulseCounter does not require the button state to be stable for one frame and works with high-frequency input (<500Hz).
- PulseCounter detects rising edges, not high levels. If the button is already being pushed at the beginning of the scene, the first pulse does not count until it is released and pushed again.
This adapter counts the number of TTL pulses (or # of button presses).
Success Condition:
Stop Condition:
Input properties:
Output properties:
Example:
- pc = PulseCounter(button_);
pc.Button = 1;
Remarks:
OnsetDetector
- Success: true once the Success of the child adapter becomes true
- When Success becomes true
- AcquiredTime: trialtime of the first signal change
- RT: Reaction (or response) time, which is the difference between the time of the first frame of the scene and the AcquiredTime
- If the child adapter's Success is true from the start of the scene, the OnserDetector will not indicate true. The adapter waits for a change from false to true.
- Exception to the first rule. If the child adapter is one of the trackers, OnsetDetector becomes true from the beginning, since the trackers never become false.
- AcquiredTime is in millisecond resolution only when the child adapter is SingleTarget, SingleButton, PulseCounter or KeyChecker. Otherwise, the precision drops to a multiple of the refresh rate.
This adapter detects when the child adapter's Success becomes true for the first time.
Success Condition:
Stop Condition:
Output properties:
Example:
- btn = SingleButton(button_);
btn.Button = 1;
Remarks:
KeyChecker
- Success: true once a key stroke is detected
- When Success becomes true
- KeyNum: Keycode number to track (the order in the keycodes given in the 'Mouse / Key' menu)
- Count: Counts of key strokes
- Time: trialtime(s) when the key was pressed
- This adapter requires MouseTracker (mouse_). To activate mouse_, check on 'Mouse / Key' in the [Other device settings] menu and type the keycodes to monitor there.
- See the keycode table for available keys.
This adapter checks the state of a key. Key code(s) to monitor must be set in the [Other device settings] menu first.
Success Condition:
Stop Condition:
Input properties:
Output properties:
Example:
- kc = KeyChecker(mouse_);
kc.KeyNum = 1;
Remarks:
TimeCounter
- Success: true when Duration has passed
- When Success becomes true
- Duration: In milliseconds
- The stimuli will be presented for one frame even if Duration is 0.
- If Duration is not a multiple of the frame length, the actual duration can be longer up to one frame.
- Stimuli will not disappear, even after TimeCounter finishes. To remove the stimuli from the screen, call the idle command or present next scene.
This adapter measures a duration.
Success Condition:
Stop Condition:
Input properties:
Example:
- box = BoxGraphic(null_);
box.List = { [1 1 1], [1 1 1], 3, [0 0] };
tc = TimeCounter(box);
tc.Duration = 1000;
scene = create_scene(tc);
run_scene(scene);
idle(0);
Remarks:
FrameCounter
- Success: true when the given number of frames (NumFrame) is presented
- When Success becomes true
- NumFrame: Number of frames
- FrameCounter will spend at least one frame, even if NumFrame is 0.
- Stimuli will not turn themselves off, even after TimeCounter finishes. To turn off the stimuli, call the idle command or present next scene.
This adapter measures a duration in terms of the number of frames.
Success Condition:
Stop Condition:
Input properties:
Example:
- bhv_code(10,
Remarks:
AnalogInputMonitor
- Success: The same value as the child adapter's Success
- When the child adapter stops
- Channel: General Input number from the I/O menu (scalar) or signal name such as 'general1', 'gen2', 'highfrequency3', 'high4', 'voice', etc.
- Position: [left top width height] of the monitor panel in pixels. When not resized, the left-top corner of the control screen is [0 0] and the right-bottom is [800 600]. Alternatively normalized units (0 to 1) can be used.
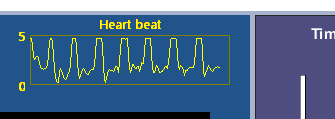
- YLim: Voltage range ([ymin ymax]) of the selected General Input to display
- Title: Name of the selected General Input
- Color: [R G B]
- UpdateInterval: Update intervals in frames. 1, by default.
This adapter draws a trace of a selected signal (General Input, High Frequency and Voice) on the control screen for a monitoring purpose.
Success Condition:
Stop Condition:
Input properties:
Example:
- aim = AnalogInputMonitor(null_);
aim.Channel = 1;
PropertyMonitor
- Success: The same value as the child adapter's Success
- When the child adapter stops
- Dashboard: Dashboard line number
- Color: Dashboard color
- ChildProperty: A property of the child adapter to monitor. 'Success', by default.
- Format: String format for dashboard (the same as formatSpec of the sprintf command). if empty, [property_name ': ' property_value] is displayed, by default.
- UpdateInterval: Update intervals in frames. 30, by default.
This adapter displays the value of a child adapter property on the dashboard during run_scene().
Success Condition:
Stop Condition:
Input properties:
Example:
- btn = SingleButton(button_);
btn.Button = 1;
WebcamMonitor
- Success: The same value as the child adapter's Success
- When the child adapter stops
- CamNumber: Webcam number, 1 to 4
- Position: [left top width height] of the monitor panel in pixels. When not resized, the left-top corner of the control screen is [0 0] and the right-bottom is [800 600]. Alternatively normalized units (0 to 1) can be used.
- UpdateInterval: Update intervals in frames. 2, by default.
- Screen: 1 (subject screen) or 2 (control screen; default value)
This adapter displays images captured by webcams on the screen.
Success Condition:
Stop Condition:
Input properties:
Example:
- cam = WebcamMonitor(null_);
cam.CamNumber = 1;
cam.Position = [0.6 0 0.4 0.4];
FrameMarker
- Success: The same value as the child adapter's Success
- When the child adapter stops
- FrameEvent: An n-by-2 cell or matrix. The 1st column is the frame number (1-based) and the 2nd column is the event(s).
- Multiple codes can be provided as a cell.
This adapter stamps eventcode(s) when a particular frame is presented.
Success Condition:
Stop Condition:
Input properties:
Example:
- bhv_code(2,
Remarks:
OnOffMarker
- Success: The same value as the child adapter's Success
- When the child adapter stops
- OnMarker: Eventcode to send when the state of the child adapter changes from false to true
- OffMarker: Eventcode to send when the state of the child adapter changes from true to false
- ChildProperty: A property of the child adapter to monitor. 'Success', by default.
- The cycle of calling OnOffMarker is synchronized with the screen refresh rate, so the actual time of the state change can be earlier than the time of events by up to one frame length.
This adapter sends out pre-set eventcodes when the state of a child adapter property changes.
Success Condition:
Stop Condition:
Input properties:
Example:
- bhv_code(0,
Remarks:
OnOffDisplay
- Success: The same value as the child adapter's Success
- When the child adapter stops
- Dashboard: Dashboard line number
- OnMessage: Message to show when the state of the child adapter is true
- OffMessage: Message to show when the state of the child adapter is false
- OnColor: Color of OnMessage
- OffColor: Color of OffMessage
- ChildProperty: A property of the child adapter to monitor. 'Success', by default.
This adapter displays pre-set messages depending on the state of a child adapter property.
Success Condition:
Stop Condition:
Input properties:
Example:
- btn = SingleButton(button_);
btn.Button = 1;
OnOffGraphic
- Success: The same value as the child adapter's Success
- When the child adapter stops
- OnGraphic: TaskObjects# or a graphic adapter to display while the state of the child adapter is true
- OffGraphic: TaskObjects# or a graphic adapter to display while the state of the child adapter is false
- ChildProperty: A property of the child adapter to monitor. 'Success', by default.
- setOnGraphic(graphic_obj, index): Either graphic TaskObjects or a graphic adapter. If the graphic adapter has multiple objects created with the List property, use the optional index argument, to indicate which one(s) should be used.
- setOffGraphic(graphic_obj, index): The same as setOnGraphic.
This adapter draws pre-set graphics depending on the state of a child adapter property.
Success Condition:
Stop Condition:
Input properties:
Methods:
Example:
- crc = CircleGraphic(null_);
crc.List = { [1 1 1], [1 1 1], 1, [-3 3]; [1 1 1], [1 1 1], 1, [3 3]; ...
[1 0 0], [1 0 0], 1, [-3 -3]; [1 0 0], [1 0 0], 1, [3 -3] };
fix = SingleTarget(eye_);
fix.Target = [0 0];
fix.Threshold = 3;
on = OnOffGraphic(fix);
on.setOnGraphic(crc,[2 3]);
on.setOffGraphic(crc,[1 4]);
tc = TimeCounter(on);
tc.Duration = 5000;
scene = create_scene(tc);
run_scene(scene);
PhotoDiode
- Success: The same value as the child adapter's Success
- When the child adapter stops
- Mode: 'Frame' (default) or 'Event'. This option determines whether to toggle the trigger per frame or eventcode.
- The photodiode trigger option should be selected on the main menu.
- For the event mode, this adapter should be the parent of another adapter that produces eventcodes, as in Example 2, or added to the aggregators at the very last.
Normally the photodiode trigger is toggled only at the beginning of a scene, but this adapter makes it toggled every frame during the scene (Example 1) or when an eventcode is issued (Example 2).
Success Condition:
Stop Condition:
Input properties:
Example 1:
- pd = PhotoDiode(null_);
Example 2:
- img = ImageChanger(null_);
img.List = {
Remarks:
BoxGraphic
- Success: The same value as the child adapter's Success
- When the child adapter stops
- Enable: true (by default) or false
- EdgeColor: [R G B]
- FaceColor: [R G B]
- Size: A scalar (square) or a 1-by-2 vector (rectangle), [width height] in degrees
- Position: [X Y] in degrees
- Scale: Magnification. 1, by default. Use a two-element vector to apply X & Y scales separately, like [x_scale y_scale].
- Angle: Rotation in degrees. 0, by default.
- Zorder: z-order; 0 (back; by default) to 2147483647 (front)
- List: Use this property, instead of the above ones, to create multiple objects at once. See Example 2.
- box.List = { edgecolor1, facecolor1, size1, position1, scale1, angle1; ...
edgecolor2, facecolor2, size2, position2, scale2, angle2; ... } - Previously, graphic adapters could not be directly assigned as Target, but it is now possible as shown in the above example. Update to the latest version, if it does not work.
This adapter draws a square/rectangle.
Success Condition:
Stop Condition:
Input properties:
Example 1:
- box = BoxGraphic(null_);
box.EdgeColor = [1 0 0];
box.FaceColor = [0 0 1];
box.Size = [4 3];
box.Position = [-5 5];
fix = SingleTarget(eye_);
fix.Target = box;
fix.Threshold = 3;
wth = WaitThenHold(fix);
wth.WaitTime = 5000;
wth.HoldTime = 500;
scene = create_scene(wth);
run_scene(scene);
Example 2:
- box = BoxGraphic(null_);
box.List = { [1 0 0], [0 0 1], [4 3], [-5 5] };
Remarks:
CircleGraphic
- For the Size argument, use a scalar for a circle (diameter, not radius) or a 1-by-2 vector for an ellipse ([major_axis minor_axis]).
This adapter is the same as BoxGraphic except that this one draws a circle/oval.
Remarks:
PieGraphic
- Success: The same value as the child adapter's Success
- When the child adapter stops
- Enable: true (by default) or false
- EdgeColor: [R G B]
- FaceColor: [R G B]
- Size: A scalar (square) or a 1-by-2 vector (rectangle), [width height] in degrees
- Position: [X Y] in degrees
- StartDegree: Angle measured in degrees counter-clockwise from the x-axis to the first side of the pie shape
- CenterAngle: Angle measured in degrees counter-clockwise from StartDegree to the second size of the pie shape
- Scale: Magnification. 1, by default. Use a two-element vector to apply X & Y scales separately, like [x_scale y_scale].
- Angle: Rotation in degrees. 0, by default.
- Zorder: z-order; 0 (back; by default) to 2147483647 (front)
- List: Use this property, instead of the above ones, to create multiple objects at once. See Example 2.
- pie.List = { edgecolor1, facecolor1, size1, position1, startdeg1, centerang1, scale1, angle1; ...
edgecolor2, facecolor2, size2, position2, startdeg2, centerang2, scale2, angle2; ... } - Previously, graphic adapters could not be directly assigned as Target, but it is now possible as shown in the above example. Update to the latest version, if it does not work.
This adapter draws a filled arc.
Success Condition:
Stop Condition:
Input properties:
Example 1:
- pie = PieGraphic(null_);
pie.EdgeColor = [1 0 0];
pie.FaceColor = [1 1 0];
pie.Size = [4 3];
pie.Position = [-5 5];
pie.StartDegree = 45;
pie.CenterAngle = 270;
fix = SingleTarget(eye_);
fix.Target = pie;
fix.Threshold = 3;
wth = WaitThenHold(fix);
wth.WaitTime = 5000;
wth.HoldTime = 500;
scene = create_scene(wth);
run_scene(scene);
Example 2:
- pie = PieGraphic(null_);
pie.List = { [1 0 0], [1 1 0], [4 3], [-5 5], 45, 270 };
Remarks:
PolygonGraphic
- Success: The same value as the child adapter's Success
- When the child adapter stops
- Enable: true (by default) or false
- EdgeColor: [R G B]
- FaceColor: [R G B]
- Size: A scalar (square) or a 1-by-2 vector (rectangle), [width height] in degrees
- Position: [X Y] in degrees
- Vertex: An n-by-2 matrix (n = number of vertices), [X1 Y1; X2 Y2; ...] in normalized coordinates (0 to 1)
- Scale: Magnification. 1, by default. Use a two-element vector to apply X & Y scales separately, like [x_scale y_scale].
- Angle: Rotation in degrees. 0, by default.
- Zorder: z-order; 0 (back; by default) to 2147483647 (front)
- List: Use this property, instead of the above ones, to create multiple objects at once. See Example 2.
- poly.List = { edgecolor1, facecolor1, size1, position1, vertex1, scale1, angle1; ...
edgecolor2, facecolor2, size2, position2, vertex2, scale2, angle2; ... } - Previously, graphic adapters could not be directly assigned as Target, but it is now possible as shown in the above example. Update to the latest version, if it does not work.
This adapter draws a user-defined polygon.
Success Condition:
Stop Condition:
Input properties:
Example 1:
- star = PolygonGraphic(null_);
star.EdgeColor = [0 1 0];
star.FaceColor = [0 1 0];
star.Size = 2;
star.Position = [0 0];
star.Vertex = [0.5 1; 0.375 0.625; 0 0.625; 0.25 0.375; 0.125 0; 0.5 0.25; 0.875 0; 0.75 0.375; ...
1 0.625; 0.625 0.625];
fix = SingleTarget(eye_);
fix.Target = star;
fix.Threshold = 3;
wth = WaitThenHold(fix);
wth.WaitTime = 5000;
wth.HoldTime = 500;
scene = create_scene(wth);
run_scene(scene);
Example 2:
- star = PolygonGraphic(null_);
star.List = { [0 1 0], [0 1 0], 2, [0 0], [0.5 1; 0.375 0.625; 0 0.625; 0.25 0.375; 0.125 0; ...
0.5 0.25; 0.875 0; 0.75 0.375; 1 0.625; 0.625 0.625] };
Remarks:
TextGraphic
- Success: The same value as the child adapter's Success
- When the child adapter stops
- Enable: true (by default) or false
- Text: Text to display
- Position: [X Y] in degrees
- FontFace: Font name ('Arial', by default).
- FontSize: In points (10, by default)
- FontColor: [R G B] ([1 1 1], by default)
- FontStyle: 'normal' (default), 'bold', 'italic', 'underline' or 'strikeout'
- HorizontalAlignment: 'left' (default), 'center' or 'right'
- VerticalAlignment: 'top' (default), 'middle' or 'bottom'
- Scale: Magnification. 1, by default. Use a two-element vector to apply X & Y scales separately, like [x_scale y_scale].
- Angle: Rotation in degrees. 0, by default.
- Zorder: z-order; 0 (back; by default) to 2147483647 (front)
- List: Use this property, instead of the above ones, to create multiple objects at once. See Example 2.
- text.List = { text1, position1, fontface1, fontsize1, fontcolor1, fontstyle1, halign1, valign1, scale1, angle1; ...
text2, position2, fontface2, fontsize2, fontcolor2, fontstyle2, halign2, valign2, scale2, angle2; ... } - Size: Size of the created text. In degrees.
This adapter draws a user string.
Success Condition:
Stop Condition:
Input properties:
Output properties:
Example 1:
- txt = TextGraphic(null_);
txt.Text =
Example 2:
- txt = TextGraphic(null_);
txt.List = {
ImageGraphic
- Success: The same value as the child adapter's Success
- When the child adapter stops
- Enable: true (by default) or false
- Position: [X Y] in degrees
- Scale: Magnification. 1, by default. Use a two-element vector to apply X & Y scales separately, like [x_scale y_scale].
- Angle: Rotation in degrees. 0, by default.
- Zorder: z-order; 0 (back; by default) to 2147483647 (front)
- List: An n-by-2, n-by-3 or n-by-4 cell matrix. Use this property to create multiple image objects. Their Position, Scale and Angle properties can be changed afterward.
- 1st column: Image filename, function string (see Remarks) or image matrix (Y-by-X-by-3 or Y-by-X-by-4)
- 2nd column: Image XY position in visual angles, an n-by-2 matrix ([x1 y1; x2 y2; ...])
- 3rd column (optional): Colorkey, [R G B] that should look transparent
- 4th column (optional): Resize parameter. [Xsize Ysize] in pixels or a scalar (scale).
- 5th column (optional): Angle. In degrees.
- Size: Size of the created graphic in degrees ([x1 y1; x2 y2; ...]).
- To show multiple images at the same time, put each of them in a different row of the List property.
- The function string must be a char array that contains a function name and its argument(s), like 'make_circle(300,[1 1 1],1)'.
- In case that the image matrix contains 4 color panes, the first one is alpha and the other three are RGB. See "MonkeyLogic Graphics Library" for the details.
- Using image matrices can increase the size of the data file, because they are kept in the data file. Consider using image files or function strings, if possible.
- When the scene ends, the image(s) will stay on the screen. They are overwritten by the next scene or can be manually cleared with idle.
This adapter presents static images.
Success Condition:
Stop Condition:
Input properties:
Output properties:
Example 1:
- img = ImageGraphic(null_);
img.List = {
Example 2:
- img = ImageGraphic(null_);
img.List = {
Remarks:
MovieGraphic
- Success: The same value as the child adapter's Success
- When the child adapter stops
- Enable: true (by default) or false
- Position: [X Y] in degrees
- Looping: false (do not repeat) or true (repeat)
- Scale: Magnification. 1, by default. Use a two-element vector to apply X & Y scales separately, like [x_scale y_scale].
- Angle: Rotation in degrees. 0, by default.
- Zorder: z-order; 0 (back; by default) to 2147483647 (front)
- PlayPosition: Play position in milliseconds
- List: An n-by-2 or n-by-3 cell matrix. Use this property to create multiple movie objects. The other properties can be changed afterward.
- 1st column: Movie filename, function string or movie matrix (Y-by-X-by-3-by-N or Y-by-X-by-4-by-N, N: # of frames)
- 2nd column: XY position in visual angles, an n-by-2 matrix ([x1 y1; x2 y2; ...])
- 3rd column (optional): Repeat (true) or not (false, by default) when the end of the movie is reached
- 4th column (optional): Scale. A scalar. 1 means no change in size.
- 5th column (optional): Angle. In degrees.
- Size: Size of the created graphic in degrees ([x1 y1; x2 y2; ...]).
- Duration: Length of the movie in milliseconds ([d1; d2; d3; ...]).
- If the scene ends before the movie finishes, the last shown frame will stay on the screen. It will be cleared when the next scene starts or with idle(0).
- Although a movie can be created from a matrix like Example 3, it increases the size of the data file rapidly because the matrix is saved for reconstructing initial conditions. Consider using a movie file or a function, like Example 1 & 2, to avoid such an issue.
This adapter presents movies.
Success Condition:
Stop Condition:
Input properties:
Output properties:
Example 1:
- mov = MovieGraphic(null_);
mov.List = {
Example 2:
- mov = MovieGraphic(null_);
mov.List = { sprintf(
Example 3:
- imdata = rand(100, 200, 3, 3 * Screen.RefreshRate);
Remarks:
SineGrating
- Success: The same value as the child adapter's Success
- When the child adapter stops
- Enable: true (by default) or false
- Position: [X Y] in degrees
- Radius: Radius of the aperture in degrees
- Direction: Degree
- SpatialFrequency: Cycles per degree
- TemporalFrequency: Cycles per second
- Phase: Degree; 0, by default.
- Color1: 1-by-3 RGB vector
- Color2: 1-by-3 RGB vector
- WindowType: 'none', 'circular' (default), 'triangular', 'sine' (or 'cosine'), 'hann', 'hamming', 'gaussian'
- WindowSize: sigma for 'gaussian' (optional). 1/3 of Radius, by default.
- Zorder: z-order; 0 (back; by default) to 2147483647 (front)
- List: Use this property, instead of the above ones, to create multiple objects at once. See Example 2.
- grat.List = { position1, radius1, direction1, spatialfreq1, temporalfreq1, phase1, color11, color21, wintype1, winsize1; ...
position2, radius2, direction2, spatialfreq2, temporalfreq2, phase2, color12, color22, wintype2, winsize2; ... } - Success: The same value as the child adapter's Success
- When the child adapter stops
- Enable: true (by default) or false
- Position: [X Y] in degrees
- Radius: Radius of the aperture in degrees
- Coherence: 0 to 100
- Direction: Degree
- Speed: Degrees per sec
- NumDot: Numbers of dots; 100, by default
- DotSize: In degrees; 0.15, by default
- DotColor: [R G B]; [1 1 1], by default
- DotShape: 'square' (by default) or 'circle'
- Interleaf: Number of frames interleaving; 3, by default
- Zorder: z-order; 0 (back; by default) to 2147483647 (front)
- List: Use this property, instead of the above ones, to create multiple objects at once. See Example 2.
- rdm.List = { position1, radius1, coherence1, direction1, speed1, numdot1, dotsize1, dotcolor1, dotshape1, interleaf1; ...
position2, radius2, coherence2, direction2, speed2, numdot2, dotsize2, dotcolor2, dotshape2, interleaf2; ... } - RectangularRDM is the same as this adapter. Just its aperture size is specified by the Size property ([width height] in degrees), instead of Radius.
- Success: The same value as the child adapter's Success
- When the child adapter stops
- Enable: true (by default) or false
- Position: [X Y] in degrees
- Zorder: z-order; 0 (back; by default) to 2147483647 (front)
- add(graphic_obj, index): Add a graphic adapter to stack
- Success: true when all x & y positions are traced to the end
- When Success becomes true
- Target: Either a graphic TaskObject or a graphic adapter. To select one object from a graphic adapter that contains multiple objects, use setTarget().
- DurationUnit: 'frame' (by default) or 'msec'
- Repetition: The number of times to trace the path. 1, by default.
- List: An n-by-2, n-by-3 or n-by-4 numeric matrix
- 1st column: X in degrees
- 2nd column: Y in degrees
- 3rd column: Duration (in frames or milliseconds; 1, if not provided)
- 4th column: Eventmarker (optional)
- Time: trialtime (an n-by-1 vector) when the object is moved to each position during the scene. NaN for skipped positions.
- setTarget(graphic_obj, index): If the graphic adapter has multiple objects created with the List property, set the optional index argument to indicate which one should be used.
- If DurationUnit is 'msec', the duration is rounded to the nearest multiple of the frame length.
- This adapter can be linked with SingleTarget to create a moving target. See Example 2 of SingleTarget for details.
- Success: true when all the images in the list are presented
- When Success becomes true
- List: An n-by-3 or n-by-4 or n-by-5 cell matrix
- 1st column: Image filename(s) or function string(s) (see Remarks)
- 2nd column: Image XY position(s) in visual angles, an n-by-2 matrix ([x1 y1; x2 y2; ...])
- 3rd column: Duration in number of frames (or in milliseconds. See the DurationUnit property below.)
- 4th column: Eventmarker(s); optional
- 5th column: Resize parameter, [Xsize Ysize] in pixels; optional
- DurationUnit: 'frame' (by default) or 'msec'
- Repetition: The number of times to repeat the image list. 1, by default.
- Time: trialtime (an n-by-1 vector) when each image was presented during the scene. NaN for images not shown.
- If multiple images are assigned in the same row of List, they will be displayed simultaneously.
- The function string is a char array that contains a function name and its argument(s), like 'make_circle(300,[1 1 1],1)'.
- Column 4-5 of List are optional. An n-by-3 (or n-by-4 or n-by-5) matrix is sufficient. However, to assign something to Column 5, Column 4 must be defined.
- If DurationUnit is 'msec', the duration of each image is rounded to the nearest multiple of the frame length.
- Success: true when all the given property values are used
- When Success becomes true
- Target: Either a graphic TaskObject or a graphic adapter. To select the objects in a graphic adapter that contains multiple objects, use setTarget() as in Example 2 below.
- Property: Name of the property to manipulate, such as 'EdgeColor', 'FaceColor', 'Size', 'Position', 'Scale', 'Angle' and 'Zorder'. In case of TaskObject, only 'Position', 'Scale', 'Angle' and 'Zorder' can be altered. To list multiple properties, use a cell array (see Example 2).
- List: A 1-by-p cell. p is the number of properties listed in Property. Two extra columns can be added for duration and eventmarkers.
- 1st cell: New values for the 1st property (n-row matrix). Its number of columns is dependent on the property.
- ...
- p-th cell: New values for the p-th property (n-row matrix). Its number of rows must be the same as the other cells.
- (p+1)-th cell: Duration (in frames or milliseconds); 1, by default (optional)
- (p+2)-th cell: Eventmarker (optional)
- DurationUnit: 'frame' (by default) or 'msec'
- Repetition: The number of times to repeat the value list. 1, by default.
- Time: trialtime (an n-by-1 vector) when new property values were applied during the scene. NaN for not shown.
- setTarget(graphic_obj, index): If the graphic adapter has multiple objects created with the List property, set the optional index argument to indicate which one should be used.
- If DurationUnit is 'msec', the duration of each color is rounded to the nearest multiple of the frame length.
- Success: true when all changes are made as scheduled
- When Success becomes true
- List: An n-by-4 or n-by-5 numeric matrix
- 1st column: Red (0 to 1)
- 2nd column: Green (0 to 1)
- 3rd column: Blue (0 to 1)
- 4th column: Duration (in frames or milliseconds)
- 5th column: Eventmarker; optional
- DurationUnit: 'frame' (by default) or 'msec'
- Repetition: The number of times to repeat the color list. 1, by default.
- Time: trialtime (an n-by-1 vector) when each color change was made during the scene. NaN for skipped colors.
- If DurationUnit is 'msec', the duration of each color is rounded to the nearest multiple of the frame length.
- Success: true when all sounds are finished
- When Success becomes true
- Enable: true (by default) or false
- Looping: false (do not repeat) or true (repeat)
- PlayPosition: Play position in milliseconds
- List: An n-by-1 or n-by-2 cell matrix. Use this property to create multiple sounds at the same time.
- 1st column: Audio filename, function string, or 1-by-2 vector of [duration frequency]
- 2nd column (optional): Looping; repeat (true) or not (false, by default) when the end of the sound is reached
- Duration: Length of the sound in milliseconds ([d1; d2; d3; ...]).
- Function strings must be char and contain all input arguments in the strings, as in Example 2 above.
- If the List is [duration frequency], a sine-wave tone of the given duration and frequency will be played
- If Looping is true, the sound never ends and therefore the Success property does not become true.
- Success: true when the delivery of the current waveform is done
- When Success becomes true
- Channel: Stimulation# (scalar or vector) assigned on the I/O menu.
- Waveform: can be one of the following.
- 1. A column vector (if only one channel was assigned to the Channel property)
- 2. A matrix (n-by-NumOfChannels) if multiple channels were assigned to the Channel property
- 3. A cell array that contains waveform data (1 or 2 above), to select a waveform on the fly
- 4. A MAT filename that contains one of the above waveform data. The waveform must be stored in a variable named 'y'. If there exists a variable, 'fs', in the MAT file, it will overwrite the Frequency property.
- 5. A char array that contains a function name and arguments (a.k.a. a funcion string), like 'load_waveform({''sin'',1,1000})'. The function must return [y, fs].
- Frequency: The rate of the waveform sample generation, samples per second
- WaveformNumber: In case that multiple waveforms are loaded (as a cell array), this property indicates which waveform will be used.
- OffAtSceneEnd: When true, the signal output is turned off at the end of the scene; false, by default.
- It is possible to trigger more than one analogoutput channel at a time, but all must be triggered together. This is a limitation of the DAQ device. Two independent stimulations will require two DAQ boards.
- Using numeric arrays/matrices for Waveform can increase the size of the data file quickly, since they are saved in the data file. Consider using a MAT file or a function string to avoid it.
- Success: true when all pulses are sent out
- When Success becomes true
- Port: TTL # assigned in the I/O menu. Multiple ports can be assigned as a vector.
- Duration: Pulse lengths in milliseconds; optional.
- Delay: Delay (milliseconds) in starting the pulses; optional.
- If Duration is not specified, the pulse is turned off at the end of the scene.
- If Delay or Duration is set, a background process is created to count the elapsed time. This allows presenting TTLs of which duration is not a multiple of a frame length, but the onset time may vary due to the background process creation.
- If the background TTLs are not triggered before the trial end, they are cancelled automatically.
- See Main Menu, DAQ board settings, regarding to inverted TTLs.
- Success: true if none of the child chains stopped.
- When any child chain stops.
- add(adapter): Add another adapter chain
- Note that AllContinue's behavior is dependent on the child chains' stop conditions, not the success conditions.
- Success: true if not all child chains stopped.
- When all child chains stop.
- add(adapter): Add another adapter chain
- Note that AnyContinue's behavior is dependent on the child chains' stop conditions, not the success conditions.
- Success: true when the first chain succeeds
- When the first chain stops
- add(adapter): Add another adapter chain
- Success: true when the last chain is finished succesfully
- When any chain stops with its Success false or when the last chain is finished
- EventMarker: Event marker(s) to send out, when each chain begins. Use NaN to skip a particular chain.
- CurrentChain: Chain # that is currently running or the last chain that ran, if the adapter stopped before finishing all the chains.
- add(adapter): Add another adapter chain
- This adapter can be used to combine multiple scenes into one.
- Success: true when all child chains' Success property become true
- When Success becomes true
- add(adapter): Add another adapter chain
- Note that AndAdapter's behavior is dependent on the child chains' success conditions, not the stop conditions.
- Success: true when the Success property of any one adapter chain becomes true
- When Success becomes true
- add(adapter): Add another adapter chain
- Note that OrAdapter's behavior is dependent on the child chains' success conditions, not the stop conditions.
- Success: the opposite of the child adapter's Success
- When the child adapter stops
- Success: true when the stimulus is dropped on one of the destinations
- When the stimulus is released from the hold (i.e., dropped) and moved to either destination or initial location.
- Target: Either a graphic TaskObject or a graphic adapter. To select one object from a graphic adapter that contains multiple objects, use setTarget().
- Destination: [x1 y1; x2 y2; ...] in degrees
- Gravity: Degrees per second
- GravityWindow: Radius in degrees; [width height] for a rectangular window
- Color: Color of the gravity window
- DropTime: trialtime when the stimulus is released
- DroppedDestination: Index # of the dropped destination. 0, if not dropped on any destination.
- setTarget(graphic_obj, index): If the graphic adapter has multiple objects created with the List property, set the optional index argument to indicate which one should be used.
- reset(): Return the target to its initial position.
- This adapter requires touch input.
- Before DragAndDrop is called, the target should already be touched. Confirm the finger touch first in the previous scene, as shown in the above example.
- Success: The same value as the child adapter's Success
- When the child adapter stops
- FixTime: Total accumulated fixation time in milliseconds
- FixTime can be different from the actual duration if the fixation already started before the scene or the task runs in the simulation mode.
- Success: The same value as the child adapter's Success
- When the child adapter stops
- JuiceLine: Reward channel to trigger; 1, by default.
- Schedule: An n-by-5 matrix.
- 1st column: Min Success duration for the schedule in that row to be selected (in milliseconds)
- 2nd column: Min reward interval to next reward (in milliseconds)
- 3rd column: Max reward interval to next reward (in milliseconds)
- 4th column: Reward pulse length (in milliseconds)
- 5th column: Eventcode for reward (optional)
- The success duration and reward intervals given in the 1st to 3rd columns in Schedule are rounded to the nearest multiple of the frame length. The reward duration in the 4th column is not.
- This function processes only one BHV2 file at a time.
- If the output filename is not provided, the repaired file is stored as the same name as the BHV2 but with a number index at the end, like 'filename(1).bhv2'.
- This function may not be perfect. Keep the original corrupted file, although the repaired file looks okay.
- New files are created in the current directory.
- The format of the source file is automatically determined from the file extension.
- bhv2bhvz, bhv2h5 and bhv2mat are just a wrapper of convert_format(). They convert source files of any extension, not just BHV2.
This adapter draws a sine grating.
Success Condition:
Stop Condition:
Input properties:
Example 1:
- grat = SineGrating(null_);
grat.Position = [0 0];
grat.Radius = 3;
grat.Direction = 45;
grat.SpatialFrequency = 1;
grat.TemporalFrequency = 2;
grat.Color1 = [1 0 0];
grat.Color2 = [0 1 0];
grat.WindowType =
Example 2:
- grat = SineGrating(null_);
grat.List = { [0 0], 3, 45, 1, 2, 0, [1 0 0], [0 1 0],
RandomDotMotion
This adapter draws a random dot motion stimulus.
Success Condition:
Stop Condition:
Input properties:
Example 1:
- rdm = RandomDotMotion(null_);
rdm.Position = [0 0];
rdm.Radius = 5;
rdm.Coherence = 30;
rdm.Direction = 0;
rdm.Speed = 5;
fix = SingleTarget(eye_);
fix.Target = rdm.Position;
Example 2:
- rdm = RandomDotMotion(null_);
rdm.List = { [0 0], 5, 30, 0, 5 };
Remarks:
GraphicContainer
This adapter combines various graphic adapters into one.
Success Condition:
Stop Condition:
Input properties:
Methods:
Example:
- pie = PieGraphic(null_);
pie.List = { [1 0 0], [1 1 0], [3 2], [-5 0], 45, 270 };
box = BoxGraphic(null_);
box.List = { [1 0 0], [1 0 0], 2, [5 5];
CurveTracer
This adapter translates the position of a graphic object along the given path.
Success Condition:
Stop Condition:
Input properties:
Output properties:
Methods:
Example 1:
- t = linspace(0, 2*pi, 1000)';
x = 6 * sin(3 * t);
y = 9 * sin(4 * t) ./ 1.5;
ct = CurveTracer(null_);
ct.Target = 1;
Example 2:
- crc = CircleGraphic(null_);
crc.List = { [1 0 0], [1 0 0], 1; [0 1 0], [0 1 0], 1 };
Remarks:
ImageChanger
This adapter presents multiple image sets in series.
Success Condition:
Stop Condition:
Input properties:
Output properties:
Example:
- img = ImageChanger(null_);
img.List = {
{
Remarks:
GraphicProperty
This adapter changes properties of a graphic object over the course of the scene.
Success Condition:
Stop Condition:
Input properties:
Output properties:
Methods:
Example 1:
- box = BoxGraphic(null_);
box.List = { [1 1 1], [1 1 1], [3 0.5], [0 0] };
gp = GraphicProperty(null_);
gp.Target = box;
gp.Property =
Example 2:
- box = BoxGraphic(null_);
box.List = { [1 1 1], [1 1 1], [3 0.5], [-5 0]; [1 1 1], [1 1 1], [3 0.5], [0 0] };
Remarks:
BackgroundColorChanger
This adapter changes the background color of the subject screen according to the given schedule.
Success Condition:
Stop Condition:
Input properties:
Output properties:
Example:
- bgc = BackgroundColorChanger(null_);
bgc.List = repmat([1 1 1 100; 0 0 0 100], 5, 1);
Remarks:
AudioSound
This adapter presents audio sounds.
Success Condition:
Stop Condition:
Input properties:
Output properties:
Example 1: Audio filename
- snd = AudioSound(null_);
snd.List =
Example 2: Function string
- snd = AudioSound(null_);
snd.List =
Example 3: [duration frequency]
- snd = AudioSound(null_);
snd.List = {[1000 1000], true; [1000 2000], false};
Remarks:
Stimulator
This adapter delivers electrical stimulation via analog output.
Success Condition:
Stop Condition:
Input properties:
Example:
- stim = Stimulator(null_);
stim.Channel = [1 2];
Remarks:
TTLOutput
This adapter sends out TTL pulses via digital lines.
Success Condition:
Stop Condition:
Input properties:
Example 1:
- bhv_code(10,
Example 2:
- ttl = TTLOutput(null_);
ttl.Port = [1 2];
Remarks:
AllContinue
This adapter combines multiple adapter chains and continues the scene while all the child chains continue.
Success Condition:
Stop Condition:
Methods:
Example:
- btn = SingleButton(button_);
btn.Button = 1;
fix = SingleTarget(eye_);
fix.Target = [-5 5];
fix.Threshold = 3;
wth = WaitThenHold(fix);
wth.WaitTime = 3000;
wth.HoldTime = 0;
ac = AllContinue(btn);
ac.add(wth);
scene = create_scene(ac);
run_scene(scene);
Remarks:
AnyContinue
This adapter combines multiple adapter chains and continues the scene if any of the child chains continues.
Success Condition:
Stop Condition:
Methods:
Example:
- btn = SingleButton(button_);
btn.Button = 1;
fix = SingleTarget(eye_);
fix.Target = [-5 5];
fix.Threshold = 3;
wth = WaitThenHold(fix);
wth.WaitTime = 3000;
wth.HoldTime = 0;
ac = AnyContinue(btn);
ac.add(wth);
scene = create_scene(ac);
run_scene(scene);
Remarks:
Concurrent
This adapter runs multiple adapter chains simultaneously but watches only the first chain added. This adapter is useful to add extra graphics.
Success Condition:
Stop Condition:
Methods:
Example:
- fix = SingleTarget(eye_);
Sequential
This adapter runs multiple chains sequentially.
Success Condition:
Stop Condition:
Input properties:
Output properties:
Methods:
Example:
Remarks:
AndAdapter
This adapter combines multiple adapter chains and finishes the scene when all the chains succeed.
Success Condition:
Stop Condition:
Methods:
Example:
- btn = SingleButton(button_);
btn.Button = 1;
fix = SingleTarget(eye_);
fix.Target = [-5 5];
fix.Threshold = 3;
and = AndAdapter(btn);
and.add(fix);
scene = create_scene(and);
run_scene(scene);
Remarks:
OrAdapter
This adapter combines multiple adapter chains and finishes the scene when any one of them succeeds.
Success Condition:
Stop Condition:
Methods:
Example:
- btn = SingleButton(button_);
btn.Button = 1;
fix = SingleTarget(eye_);
fix.Target = [-5 5];
fix.Threshold = 3;
or = OrAdapter(btn);
or.add(fix);
scene = create_scene(or);
run_scene(scene);
Remarks:
NotAdapter
This adapter negates the Success state of the child adapter.
Success Condition:
Stop Condition:
Example:
- btn = SingleButton(button_);
btn.Button = 1;
fix = SingleTarget(eye_);
fix.Target = [-5 5];
fix.Threshold = 3;
nofix = NotAdapter(fix);
DragAndDrop
This adapter tracks the selected graphic stimulus until it is released from the previous hold. If the released location is close to the destination, the stimulus is pulled to the destination like a magnet. Otherwise, it goes back to the initial location.
Success Condition:
Stop Condition:
Input properties:
Output properties:
Methods:
Example:
- txt1 = TextGraphic(null_);
txt1.Text =
Remarks:
FixTimeAnalyzer
This adapter counts how long a XY tracker stays in the threshold window.
Success Condition:
Stop Condition:
Output properties:
Example:
- fix.Target = [0 0];
fix.Threshold = 3;
fta = FixTimeAnalyzer(fix);
tc = TimeCounter(fta);
tc.Duration = 5000;
scene = create_scene(tc);
run_scene(scene);
dashboard(1, sprintf(
Remarks:
RewardScheduler
This adapter delivers rewards at given intervals while its child adapter's Success state is true.
Success Condition:
Stop Condition:
Input properties:
Example:
- tc = TimeCounter(null_);
tc.Duration = 10000;
fix = SingleTarget(eye_);
fix.Target = [0 0];
fix.Threshold = 5;
rwd = RewardScheduler(fix);
rwd.Schedule = [0 1000 1000 100;
Remarks:
behaviorsummary
This function reads data files and shows a performance summary.
mlbhv2repair
This function recovers readable data from a corrupted BHV2 file.
Syntax:
- mlbhv2repair;
Remarks:
convert_format (also bhv2bhvz / bhv2h5 / bhv2mat)
This function rewrites NIMH ML data files (*.bhv2, *.bhvz, *.h5, *.mat) in a different format.
Syntax:
- convert_format(format);
Remarks:
mlconcatenate
This function combines trial-by-trial analog data into one large matrix and adjusts all timestamps accordingly, as if they are recorded in one single trial. It is useful when reading data files that are continuously recorded through inter-trial intervals. This command does not process webcams and high frequency channels, since loading them all at once can cause an out-of-memory error.
Syntax:
- data = mlconcatenate;
data = mlconcatenate(filename);
[data, MLConfig, TrialRecord, filename] = mlconcatenate;
mlexportstim
This function extracts saved stimuli from the data file.
Syntax:
- stim_path = mlexportstim;
mlexportwebcam
This function reads webcam videos from the data file and saves them as MP4. It is possible to strip off the videos completely from the data file by setting the delete_video option true. The original files will be kept in the "orig" folder.
Syntax:
- mlexportwebcam
mlexportwebcam(datafile)
mlexportwebcam(datafile, delete_video)
mlimportwebcam
This function attaches exported webcam videos (MP4s) back to the data file. If the video files are not in the same folder as the data file, a path to the videos can be provided.
Syntax:
- mlimportwebcam
mlimportwebcam(datafile)
mlimportwebcam(datafile, video_folder)
mlplayer
This function opens a trial-replay and video-exporting dialog.
mlread
This function provides a unified read interface for all the data formats (*.bhv2; *.bhvz; *.h5; *.mat). It returns trial-by-trial data in a 1-by-n array of structures.
Syntax:
- data = mlread;
data = mlread(filename);
[data, MLConfig, TrialRecord, filename] = mlread(__);
mlreadsignal
This function reads signals recorded at unconventional sample rates (i.e., not 1 kHz), such as High Frequency, Voice and Webcam. These data usually have a large size, so loading them up all at once may cause an out-of-memory error. For that reason, mlread and mlconcatenate do not load them. Use this function instead.
Syntax:
- signal = mlreadsignal(signal_type);