Calibrating Eye/Joystick Signals
Calibration is a process of converting and aligning input signals to coordinates of visual object space. The first step is to set the physical dimensions of the visual space correctly. Measure the diagonal size of the subject monitor and the distance between the monitor and the subject and put them in the main menu as shown below. NIMH ML then provides you a conversion factor in pixels per degree of visual angle (45.859 in the figure shown below). Use this number to convert the size of visual objects to visual angles. For example, a 320 x 240 pixel movie is [320 240] / 45.859 = [6.9779 5.2334] degrees in visual angles. (See Pixels per degree for what the Adjust option does)
![]()
NIMH MonkeyLogic currently provides options to use Raw Signal and two calibration methods, Origin & Gain and 2-D Spatial Transformation. The Origin & Gain requires only 2 fixation points and is much easier to use with untrained subjects. The 2-D Spatial Transformation requires sampling voltages for at least 4 fixation points (or more, depending on the transform type) but can do more complex mapping by a projective or polynomial transform. Both methods include a tool to move and present the fixation point with the mouse. By clicking on yellow squares on the control screen, a fixation point will be displayed in the corresponding location on the subject screen.
There are a few shortcut keys for calibration. These shortcuts work during the task as well.
- [C] key: Brings the current eye position to the center of the screen.
- [U] key: Cancels the previous 'C' key. Undo can be done multiple times.
- [R] key: Delivers a manual reward.
- [-] key: Decreases the reward pulse length by 10 ms.
- [+] key: Increases the reward pulse length by 10 ms.
- Raw Signal (Pre-calibrated)
- Origin & Gain
- 1) To use the GUI controls on the right, unlock them first by clicking the [Unlock] button. Lock them again afterwards, to prevent your key input from triggering those controls.
- 2) Click the FP (yellow square) at the center or the [Show Center] button on the GUI. It will display a FP on the subject screen. Then wait until the subject looks at it.
- 3) Click the [Set Origin] button while the subject is looking at the central FP. Alternatively, you can press the space bar (or 'C' key). It will register the current voltage reading for the center.
- 4) Click one of the FPs on the periphery. Increase (or decrease) X & Y gains if the subject's saccade undershoots (or overshoots).
- 2-D Spatial Transformation
- 1) Only selected FPs can be presented for this calibration. These FPs are numbered. To select/unselect FPs, use the right mouse button. Changing the intervals of FPs may leave some numbers off of FPs. Those numbers can only be unselected.
- 2) Selected FPs can be turned on/off individually with the keyboard (N key & P key) or with mouse left-clicks. The FP currently being presented is indicated by a circle around it. The circle may not be shown, if its size is too small. In that case, try increasing [Fixation window radius].
- 3) Hit the space key while the subject is looking at the FP turned on the subject screen. The voltage reading at that moment will be registered for the FP location and its number will turn from red ([Uncalibrated] color) to cyan ([Calibrated] color).
- 4) There is a choice for how to reward eye fixation. The default option is to deliver reward at the time of the space key press and move to the next FP.
- 5) Repeat 2) and 3) for the entire selected FPs a couple of times until no more improvement is observed.
- 6) The projective transformation is a linear transformation and can map a tilted voltage space to a rectangular eye space. The polynomial transformation can warp a curved voltage space (red circles in the minimap). The higher the order of the polynomial, the better the fit.
Choose this option when the signals are calibrated already, or to get unaltered input. One volt in the calibrated signals should correspond to one degree of displacement. If the signal is calibrated but the conversion ratio is not one to one, it is possible to do further adjustment with the Origin & Gain method.
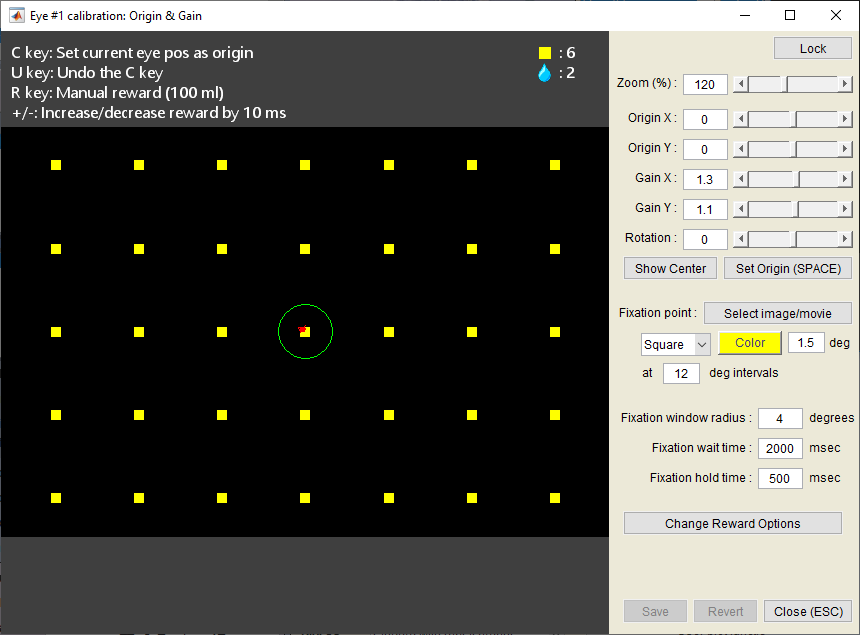
This method requires sampling the central fixation point (FP) and adjusting X & Y gains.
![]()
This tool supports two types of geometric transformations: projective and polynomial. The projective transform requires at least 4 non-collinear FPs and the polynomial transform, 10 or 15 FPs, depending on its degree.